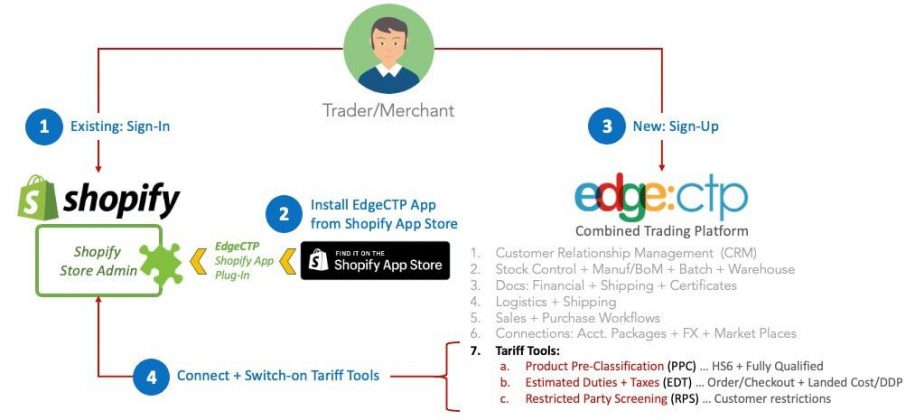
Using the correct tools for international tariff compliance requirements is critical to making sure that your goods are consigned efficiently overseas. This 9-step blog provides a step-by-step guide on how to:
- Install the EdgeCTP app into your Shopify store from the Shopify App Marketplace
- Use the international tariff tools, found within the installed EdgeCTP app, to assist you + your clients with global orders compliance, right from within Shopify
- Monitor your usage of these tariff tools
Example screenshots are provided to help you follow along with your own Shopify store.
Start with the first four installation steps, which are for your entire firm and only need to be performed once. These are:
- Install the EdgeCTP app (Edge) into your existing Shopify store
- Sign-Up to EdgeCTP just to gain access to the Tariff Tools
- Connect your Shopify store to the EdgeCTP application
- Switch on Tariff Tools services (which enables them in Shopify)
After these four steps, you can simply start using the Tariff Tools within your Shopify store. You may want to try out steps 5 to 7 (below) to learn how to use the most ‘common’ (simple) scenarios:
- How to use Product Pre-Classification (PPC) – to help classify your products to the Harmonised System (HS) code 6-digits and full tariff code 10-digits, specific to the country you send your products
- How a buyer uses Est. Duties + Taxes (EDT) during checking out – so your buyer can opt to pay for international duties + taxes at the point of buying your goods
- How to perform Restricted Party Screening (RPS) – so you can screen your buyer as being someone you can send goods/trade with BEFORE consigning the shipment
Finally, the last two steps (8 and 9) show you how to monitor your usage of the Tariff Tools services from within the:
- Shopify store admin
- EdgeCTP application’s settings
If you’d prefer a step-by-step video to watch instead then check out the
https://www.youtube.com/watch?v=cOYg5afsIRs
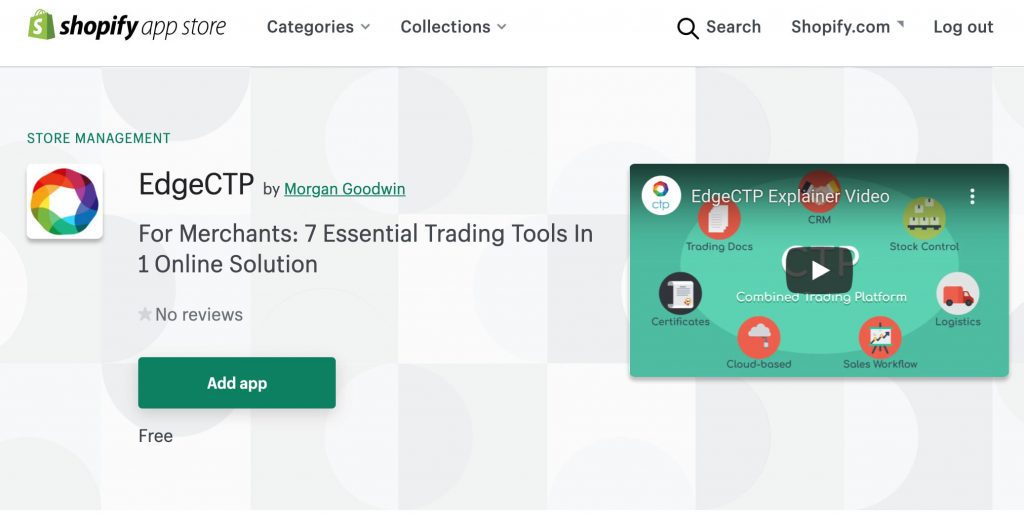
1. Install the EdgeCTP app (Edge) into your existing Shopify store
Before beginning to use the Tariff Tools within Shopify, you will need to install EdgeCTP (Edge) in your Shopify store. This section shows you how to do that.
- Login to your Shopify admin store
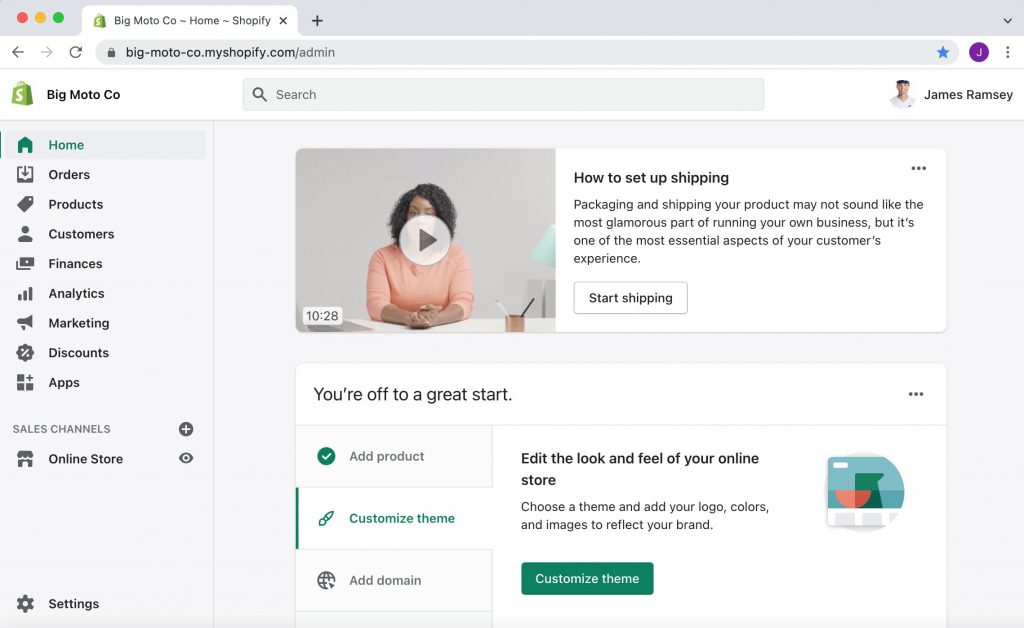
- To install the EdgeCTP app, from the left menu choose Apps > Customize your store. In the example below the store has NO apps currently installed

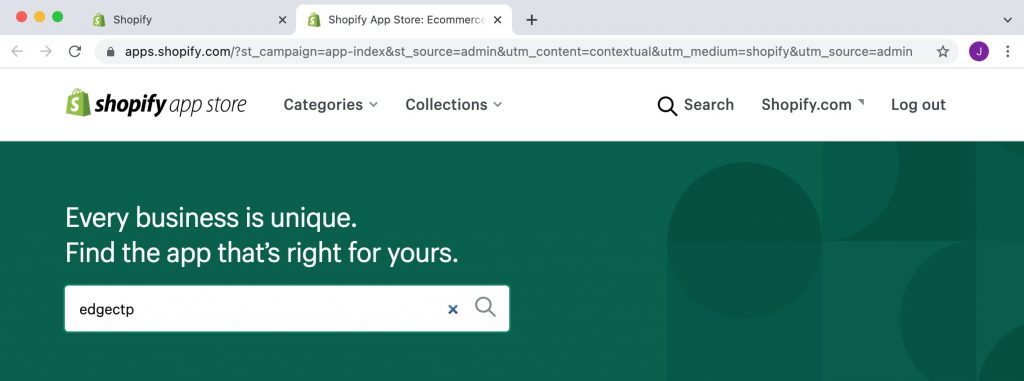
- You will be taken to the Shopify App Store (in a new browser tab) to select an app to install into your Shopify store. Type edgectp and click the search icon (or press enter on your keyboard)
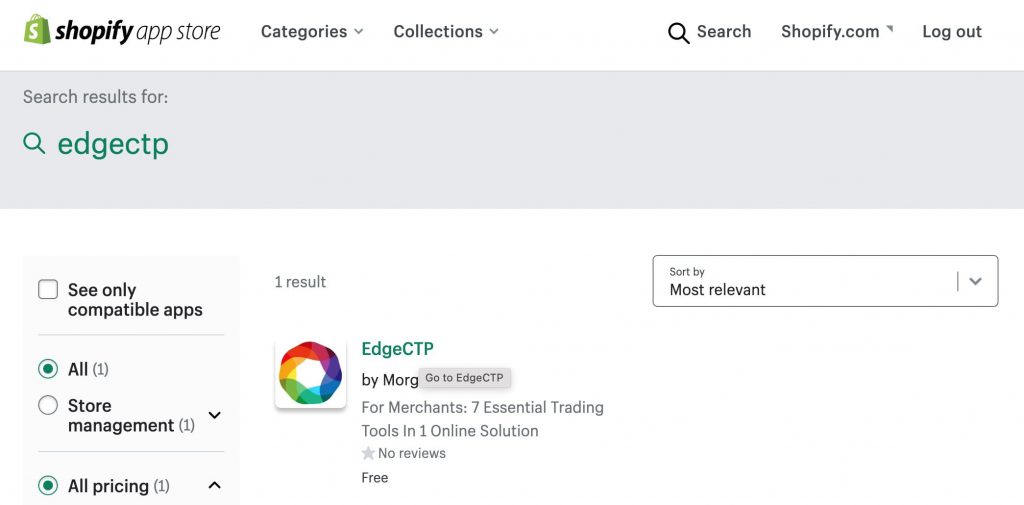
- From the search results choose the EdgeCTP app by clicking on its name
- On the EdgeCTP app landing page (you can browse the various features + benefits that EdgeCTP provides) simply click the Add app button to begin installing the EdgeCTP application into your store
- Back in your Shopify store admin, you’ll be asked to confirm you wish to install the EdgeCTP application into your store. Scroll down to the bottom of the page and click the Install app button

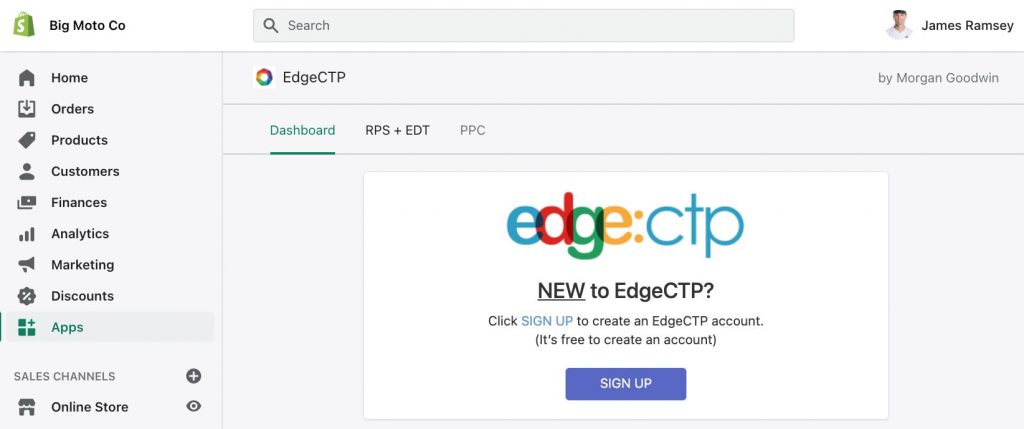
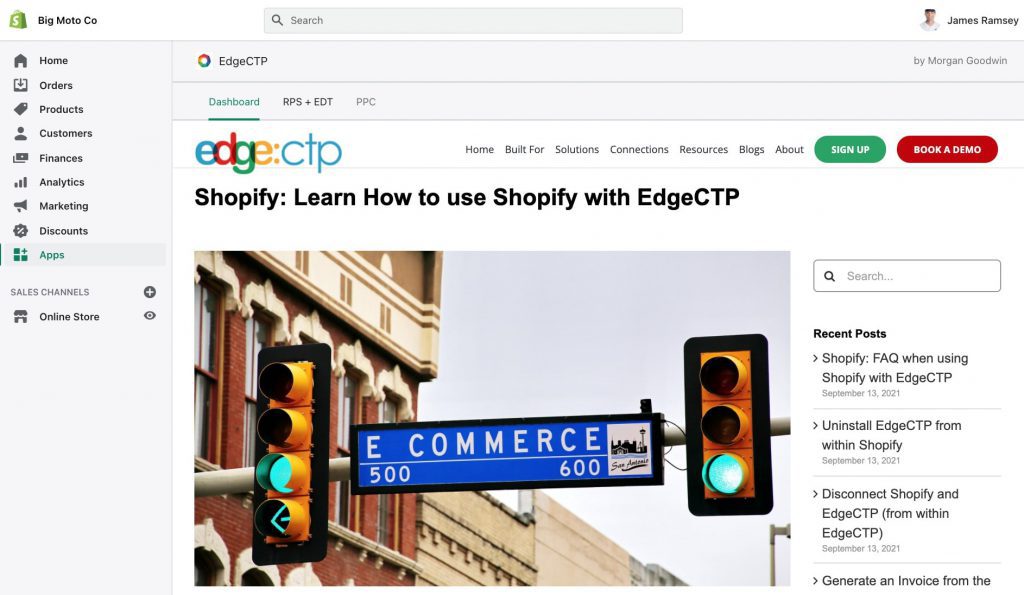
- Wait a few moments for the EdgeCTP to be installed into you Shopify store. Once installed the embedded EdgeCTP screen appears, which invites new and existing EdgeCTP account holders to sign-up and/or connect their Shopify store with their EdgeCTP account.
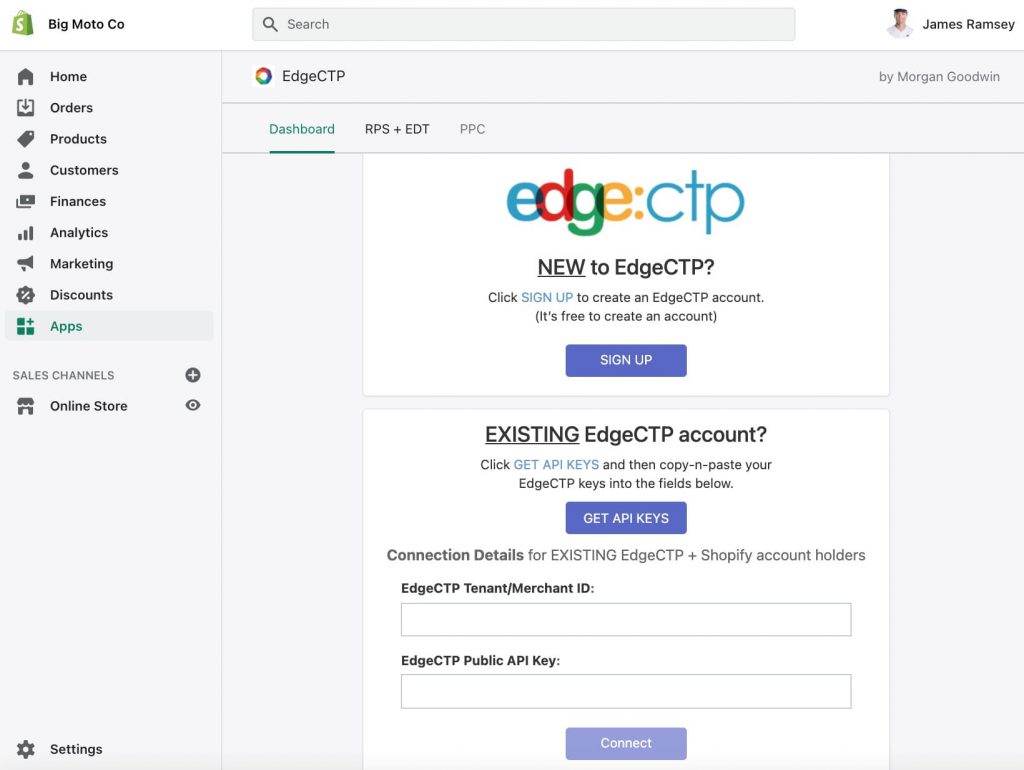
If you DON’T have an EdgeCTP account, then follow the steps in the next section “2. Sign-Up to EdgeCTP (just to gain access to the Tariff Tools)”; if you DO already have an EdgeCTP account, then skip down to the section “3. Connect EdgeCTP to your Shopify store”
2. Sign-Up to EdgeCTP (just to gain access to the Tariff Tools)
This section assumes that you’ve just installed the EdgeCTP app into your Shopify store (previous section), however, you do NOT have an EdgeCTP account. You need an EdgeCTP account to enable the Tariff Tools functionality (i.e., PPC, EDT and RPS) within your Shopify store. Follow the steps in this section to create an EdgeCTP account.
- From your Shopify admin, left menu > Apps > EdgeCTP app’s new/existing screen, click the SIGN-UP button
- EdgeCTP’s sign-up page appears in a new browser tab. Type in Your work email address; click I’m not a robot (complete any tests that come up) and click the SIGN ME UP button
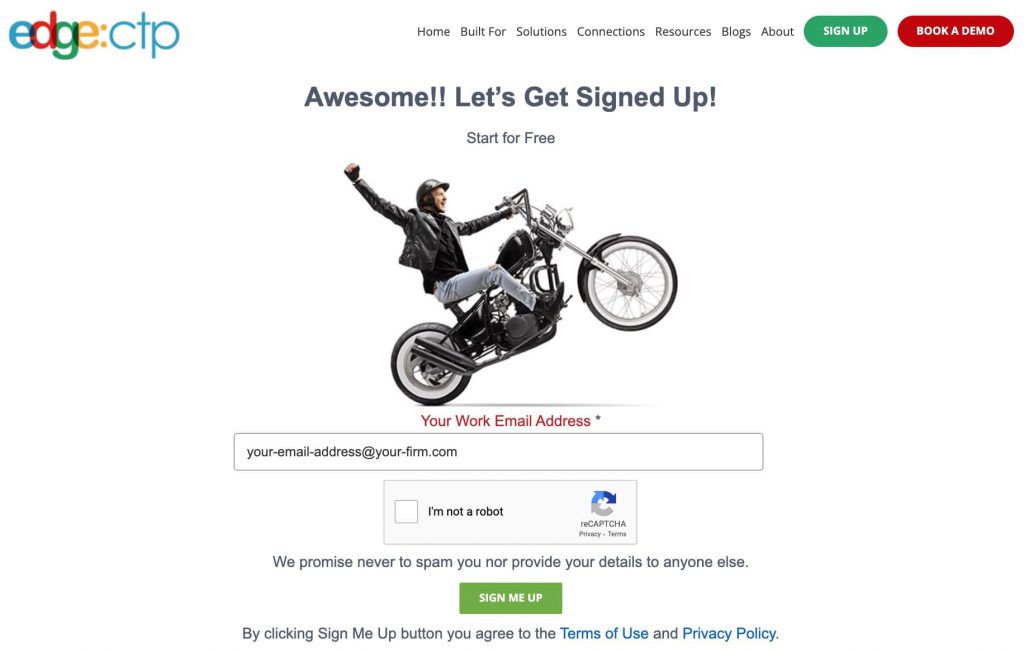
- Wait for the confirmation that your registration email has been sent
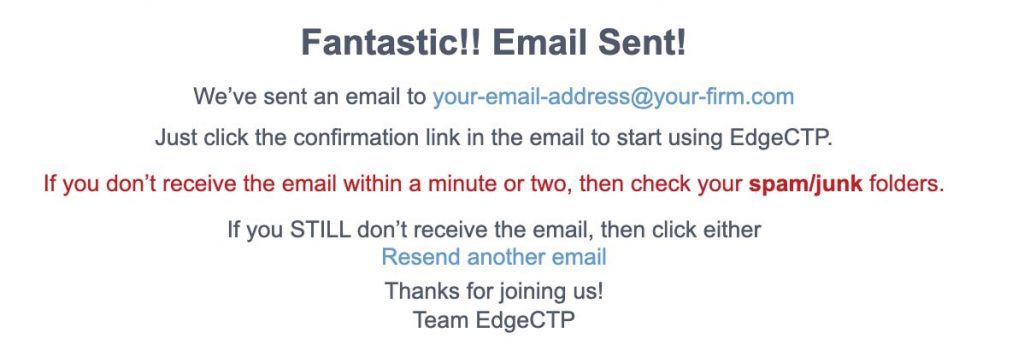
- Check your emails for the ‘EdgeCTP – Please Activate Your Account’ email. Look in your junk/spam folders if you cannot see the email in your inbox.
- Open the email and click the ‘ACTIVATE MY EDGECTP ACCOUNT’ link in the email to confirm your email address to EdgeCTP

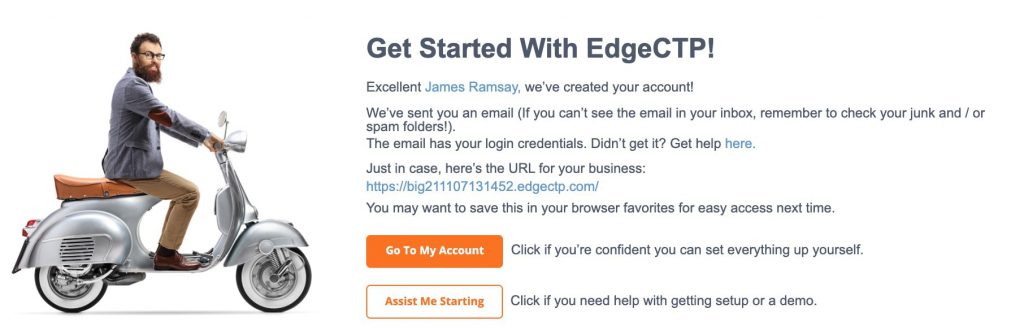
- An EdgeCTP browser tab will appear and fill-in your Business Name, First Name and Last Name, and then click the Create Account button

- Once the account is created, EdgeCTP will ask you to get started. Click the Go To My Account button, which opens the EdgeCTP login screen in a new browser tab
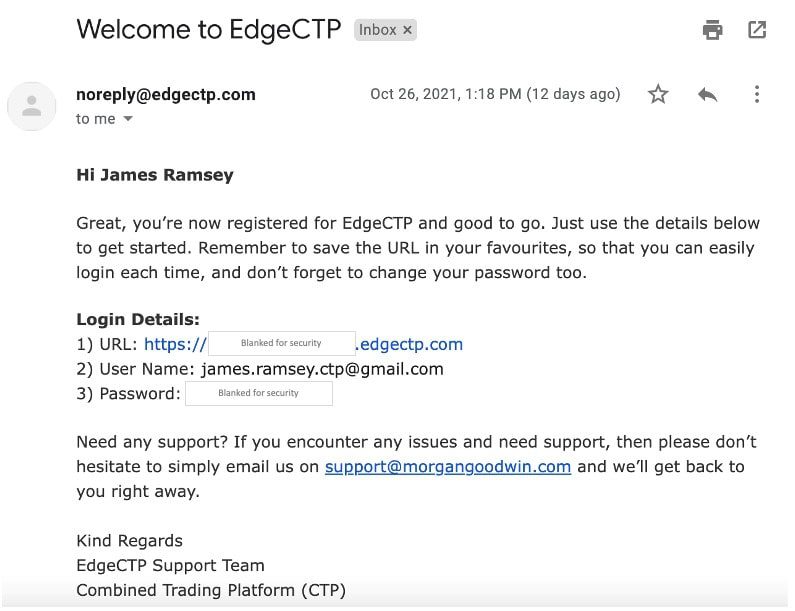
- Check your emails for the ‘Welcome to EdgeCTP’ email. Look in your junk/spam folders if you cannot see the email in your inbox.
- The EdgeCTP welcome email will contain: 1) your unique link to sign-in to your EdgeCTP account; 2) your username (usually the email address you registered with), and 3) a system generated password (which you should change after you’ve logged into EdgeCTP for the first time)
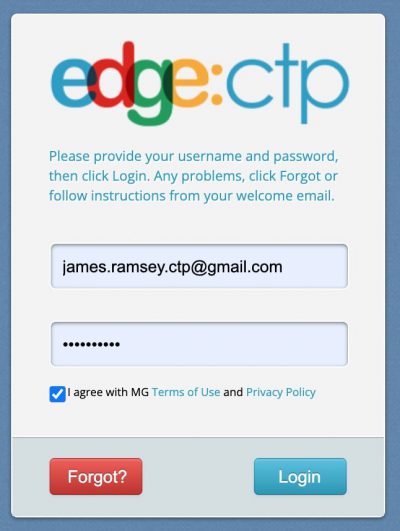
- Right-click on the URL link (point 1) in your Welcome to EdgeCTP email and open in a new tab the EdgeCTP login screen. Or simply go to the newly opened EdgeCTP login browser tab, and type in (or copy-n-paste from the Welcome to EdgeCTP email) the Username and Password; click the ‘I agree …’ checkbox and click the Login button
- Wait a few moments for EdgeCTP to load. If requested, you may wish your browser to remember your login details to Edge. Once EdgeCTP is loaded, you’ll arrive at the Company > Address Primary tab
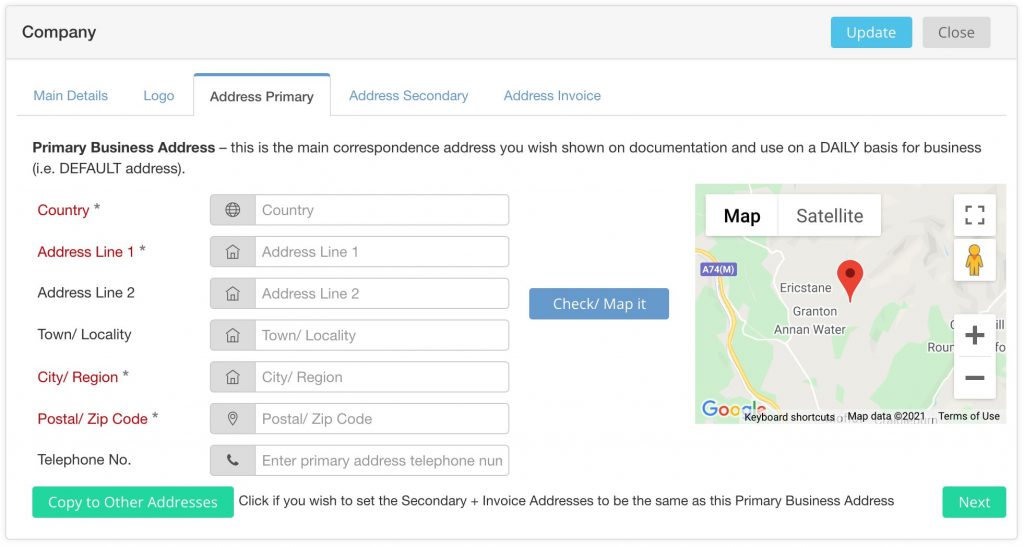
Complete the:
- Country
- Address Line(s)
- City/Region
- Postal/Zip Code
- Click the Check/Map it button to make sure the address is correctly picked up (see the generated map)
- Click the Copy to Other Addresses button, to make sure the secondary and invoice address are the same (or set them separately if they’re different)
- Click the Update button in the top right to save the company settings and then click the Close button to return to the EdgeCTP Home dashboard
That’s you signed-up and created an EdgeCTP account. Now you can connect this EdgeCTP application (which will provide the Tariff Tools services of PPC, EDT and RPS) with your Shopify store (next section).
3. Connect your Shopify store to your EdgeCTP application
This section assumes that you’ve:
- Installed the EdgeCTP app into your Shopify store and
- Signed-up/created or already have an EdgeCTP account
Follow the steps in this section to connect your EdgeCTP application with your Shopify store to enable the Tariff Tools functionality (i.e., PPC, EDT and RPS).
- Login to your Shopify store admin and in the left menu click on Apps > EdgeCTP to show the EdgeCTP New/Existing screen. If you’re following along from the previous sections of this blog, then the screen may already be open in one of your browser tabs, so just click the browser tabs to locate it
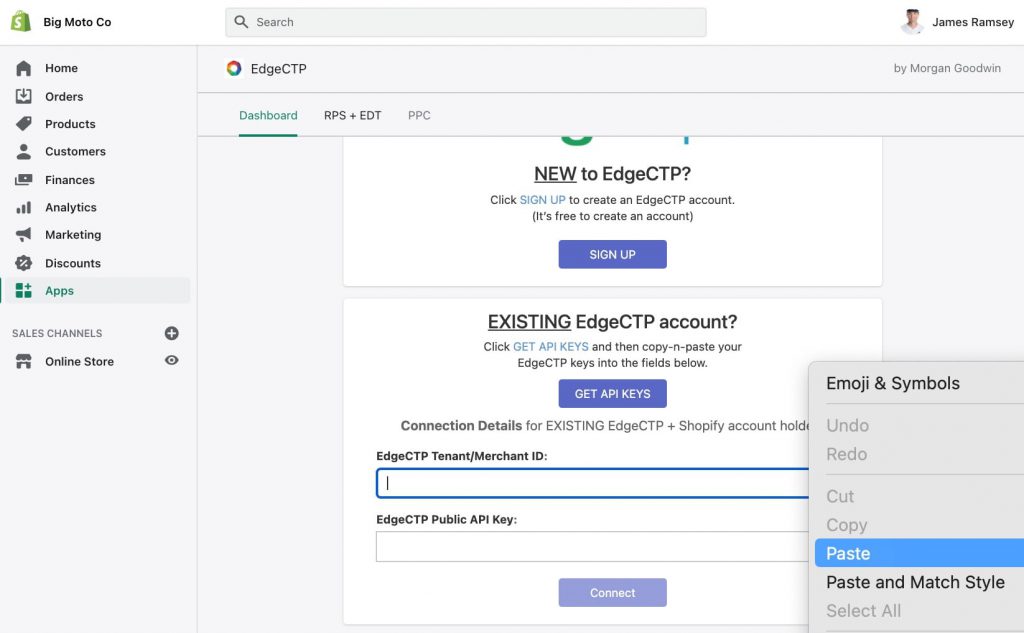
Notice that the Existing EdgeCTP account section has the two fields: EdgeCTP Tenant/Merchant ID and EdgeCTP Public API Key. The values for both these fields need to be populated, which will then establish a connection between your Shopify store and your associated EdgeCTP account. Both values are found in your EdgeCTP account - Login to your EdgeCTP account (in a different browser/tab) and make sure the EdgeCTP Home dashboard is showing. If you’re following along from the previous sections of this blog, then this EdgeCTP Home dashboard may already be open in one of your browser tabs, so click the browser tabs to locate it
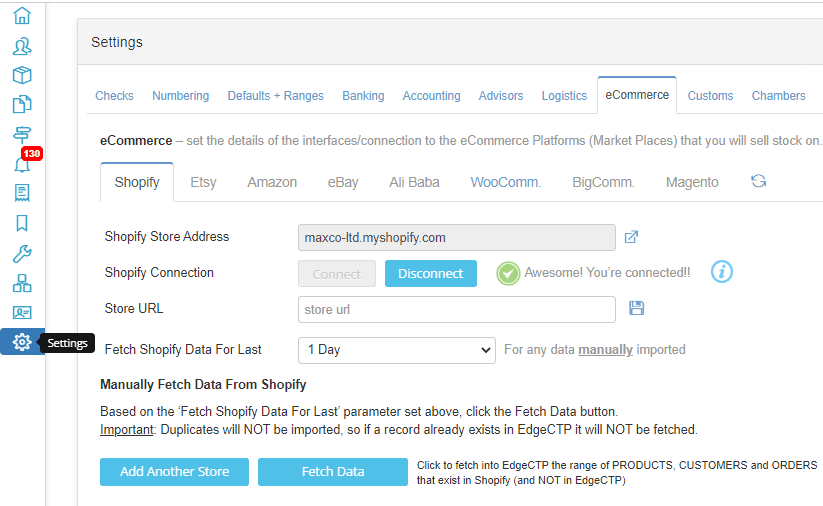
- From the EdgeCTP Home dashboard, click the left menu Settings > eCommerce > Shopify to reveal the unique Merchant ID and Public API Key fields you need to populate to make a connection

- Copy the EdgeCTP Tenant/Merchant ID field value in EdgeCTP by clicking on the copy icon (right side of the field)

- Switch back to your Shopify store admin (separate tab) and paste the copied value into the EdgeCTP Tenant/Merchant ID field value within Shopify (i.e., right-click the field and choose paste
- Switch back to your EdgeCTP tab and copy the EdgeCTP Public API Key by clicking on the copy icon (right side of the field)

- Switch back to your Shopify store admin (separate tab) and paste the copied value into the EdgeCTP Public API Key field value within Shopify (i.e., right-click the field and choose paste
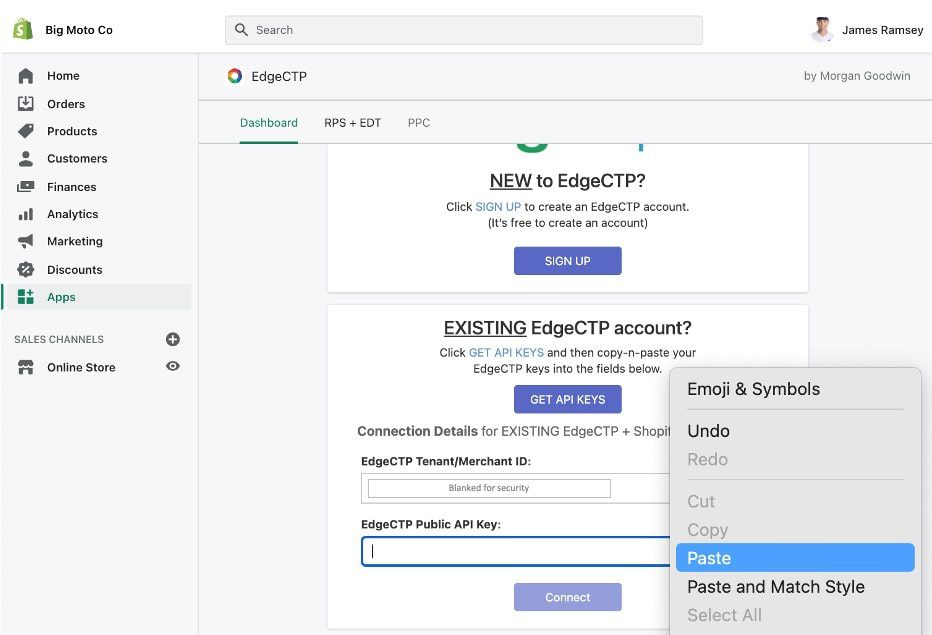
- Click the Connect button to establish the connection. Wait a few moments and a blog page (usually related to Shopify and EdgeCTP) will appear
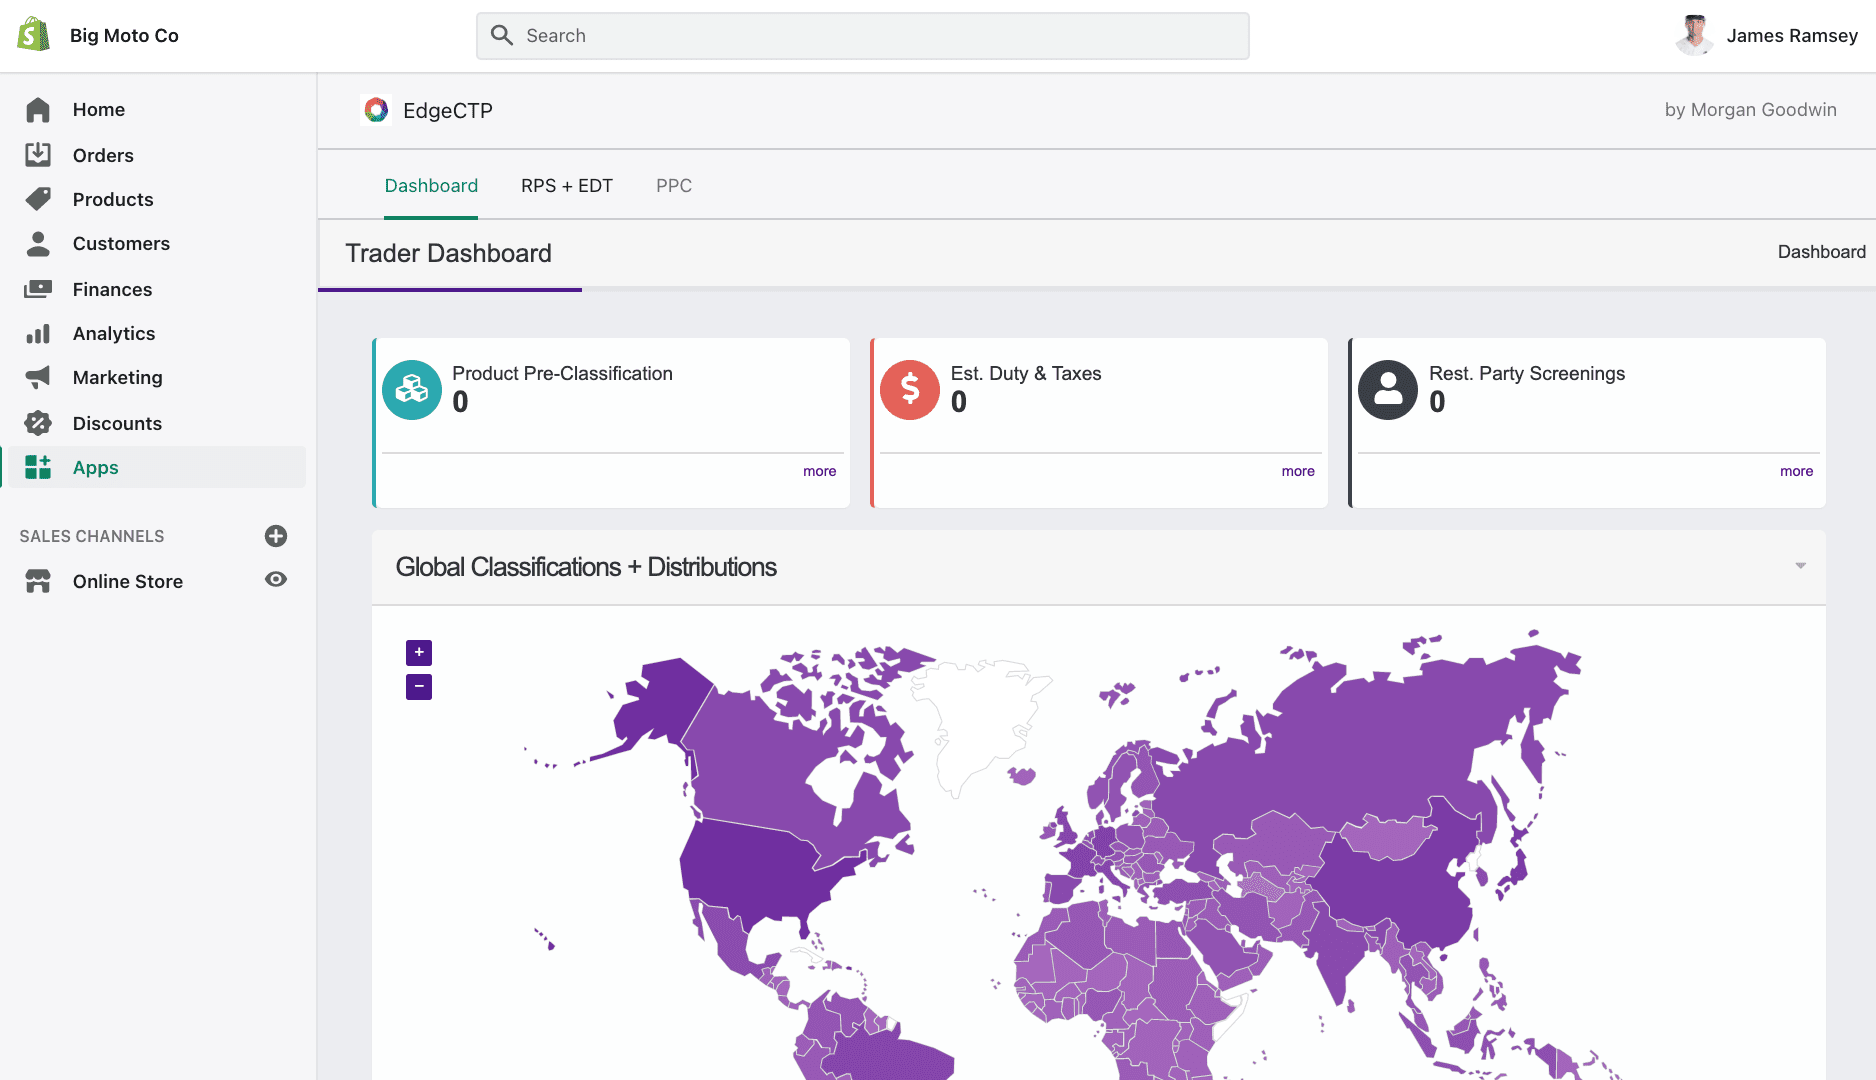
- You can click on the Dashboard, RPS+EDT and PPC menu choices within the top left of the Shopify EdgeCTP app page. Please note that the first time Shopify may take 15-20 seconds to load the screens and the values will be zero or blank initially
- To check that the connection has been established, you click back to the EdgeCTP tab in your browser and either refresh the page or choose Settings > eCommerce > Shopify. Notice the Shopify fields now have a Store Address and a Connection status of connected.
You now have Shopify connected with EdgeCTP
4. Switch on Tariff Tools services (to enable them in Shopify)
This section assumes that you’ve already:
- Installed the EdgeCTP app into your Shopify store
- Signed-up/created or already have an EdgeCTP account
- Connected your Shopify store and EdgeCTP account
Since the Tariff Tools of PPC, EDT and RPS are payable services, you will need to register a payment card within your EdgeCTP account (stored, managed and cleared security by Stripe) BEFORE you can use the Tariff Tools within Shopify.
Follow the steps in this section to register a payment card and enable the Tariff Tools functionality of PPC, EDT and RPS to work in your Shopify store admin and online store.
- Login to your EdgeCTP account and from the left menu Settings > Customs > EdgeTariff
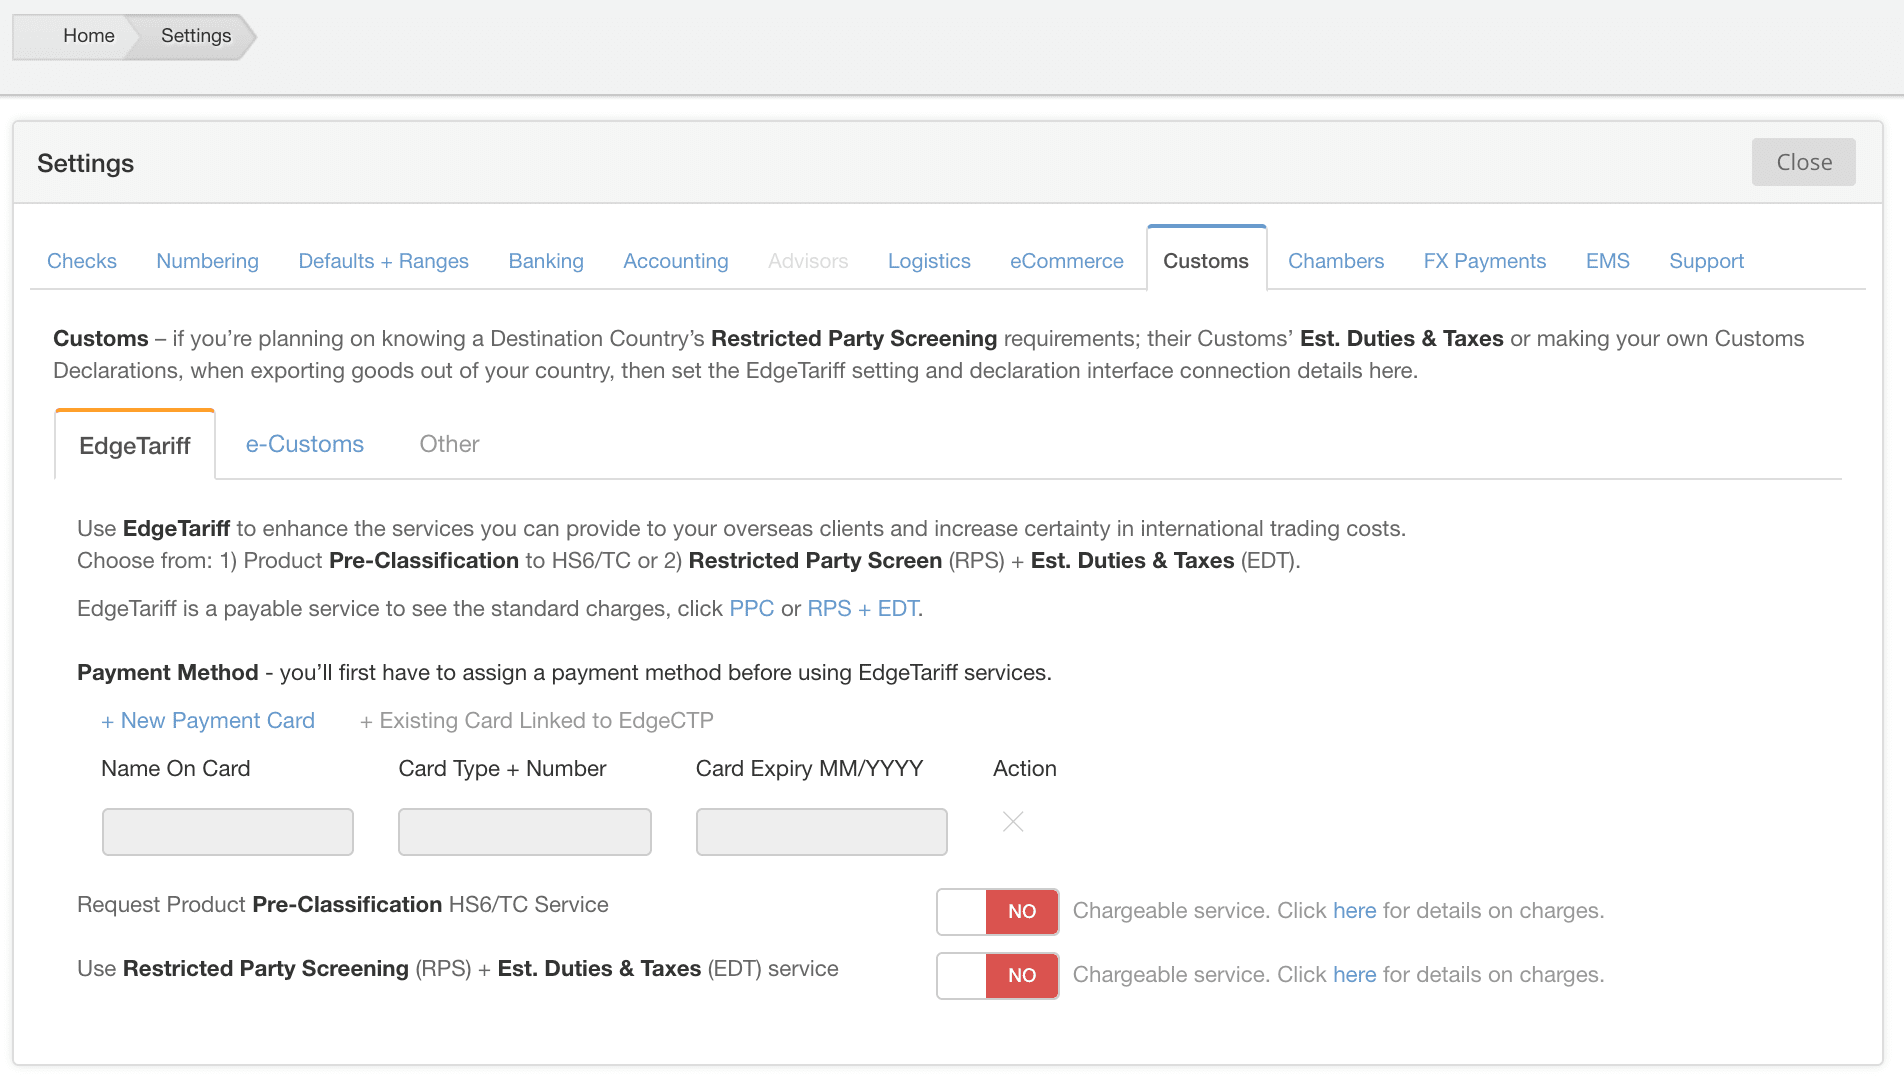
- To add a payment card for the PPC, RPS and EDT services, click the + New Payment Card link to show the Stripe card detail capture screen (URL should say: checkout.stripe.com …) )

Type in the details for your specific payment card and click Save card and you’ll return to EdgeCTP’s EdgeTariff screen, with the card added.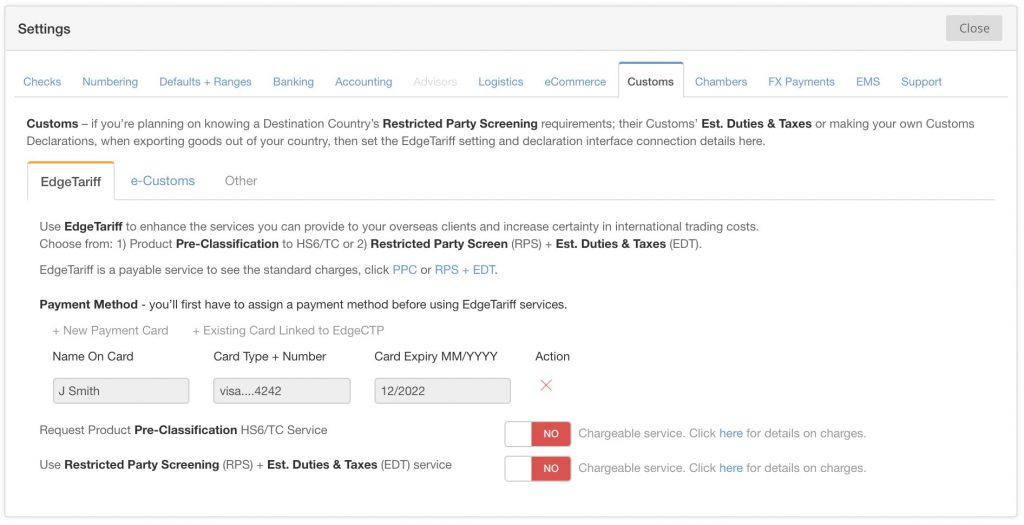
- To enable the PPC service, flick the Product Pre-Classification switch to ‘Yes’; when asked to acknowledge the charges, click the Yes- switch it on! Button

- To enable the RPS + EDT services, flick their switch to ‘Yes’; when asked to acknowledge the charges, click the Yes- switch it on! Button
That’s it! You’ve successfully setup Tariff Tools within Shopify (via EdgeCTP). You’re now good to begin using the services of PPC, EDT and RPS within your Shopify store admin and online store.
5. How to use Product Pre-Classification (PPC)
This section assumes that you’ve already:
- Installed the EdgeCTP app into your Shopify store
- Signed-up/created or already have an EdgeCTP account
- Connected your Shopify store and EdgeCTP account
- Added your payment card and switched on the PPC, EDT + RPS services in EdgeCTP
What is Product Pre-Classification (PPC)?
The Product Pre-Classification (PPC) service is one of the Tariff Tools available within the EdgeCTP application. PPC allows you, as a trader or merchant, to pre-classify or confirm the existing classification of your product(s) to the standard 6-digit Harmonised System (HS6) and the fully qualified Tariff Code (TC), i.e., 10-digits (or beyond).
For example, a motorcycle helmet has a HS6 code of 6506.10; if you’re sending/exporting the helmet to say the United Kingdom then the fully qualified TC would be 6506.10.3075 (10-digit code), which combines the HS6 (6-digits) and country specific last 4 digits.
Instant vs Curated Product Pre-Classification Service
Currently, the ‘instant’ PPC service is NOT available, however, the ‘curated’ PPC service is. This means that instead of a ‘nearly correct’ that an instant PPC service would provide, the curated PPC service gives you an in-person international trade tariff analyst, who researches and assigns a correct HS6 + TC to your product(s) and destination market(s).
Accessing Product Pre-Classification Services
Using EdgeCTP and Shopify you have the following methods to submit your product(s) for pre-classify:
- Single-selected product submission from your Shopify store admin
- Multi-selected products submission from your Shopify store admin
- Multi-products spreadsheet submission from EdgeCTP
For this blog post we’ll focus on the single-selected product submission method from within your Shopify store admin. Nevertheless, in passing we will touch on the multi-selected products submission method too. If you want to submit a spreadsheet containing your full product portfolio, then contact us and we’ll be delighted to assist.
Single-selected Product Submission for Classification
Follow the steps in this section to submit your product, already listed in your Shopify store, for classification to HS6 (6-digits) and full Tariff Code (10-digits).
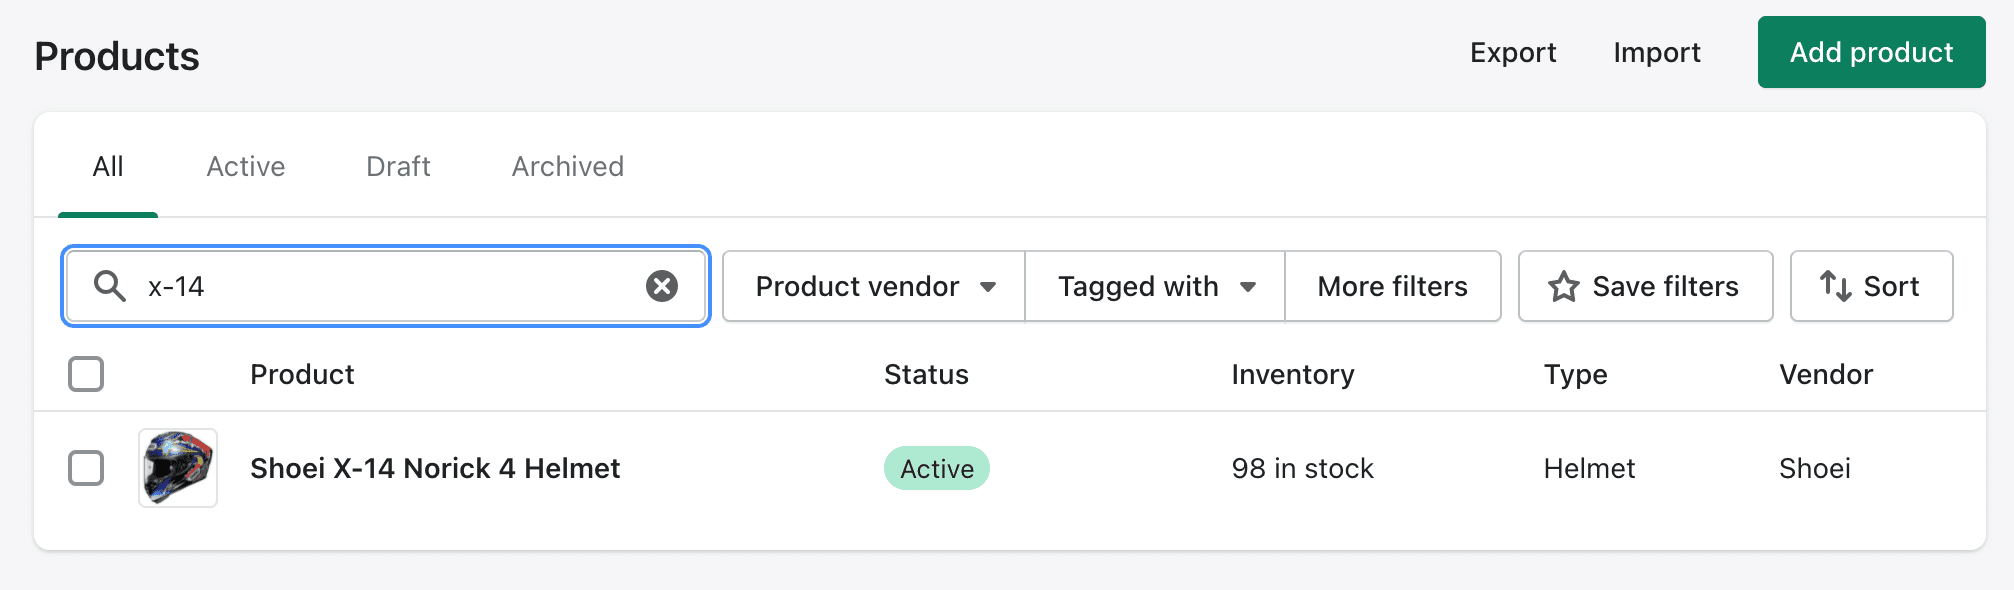
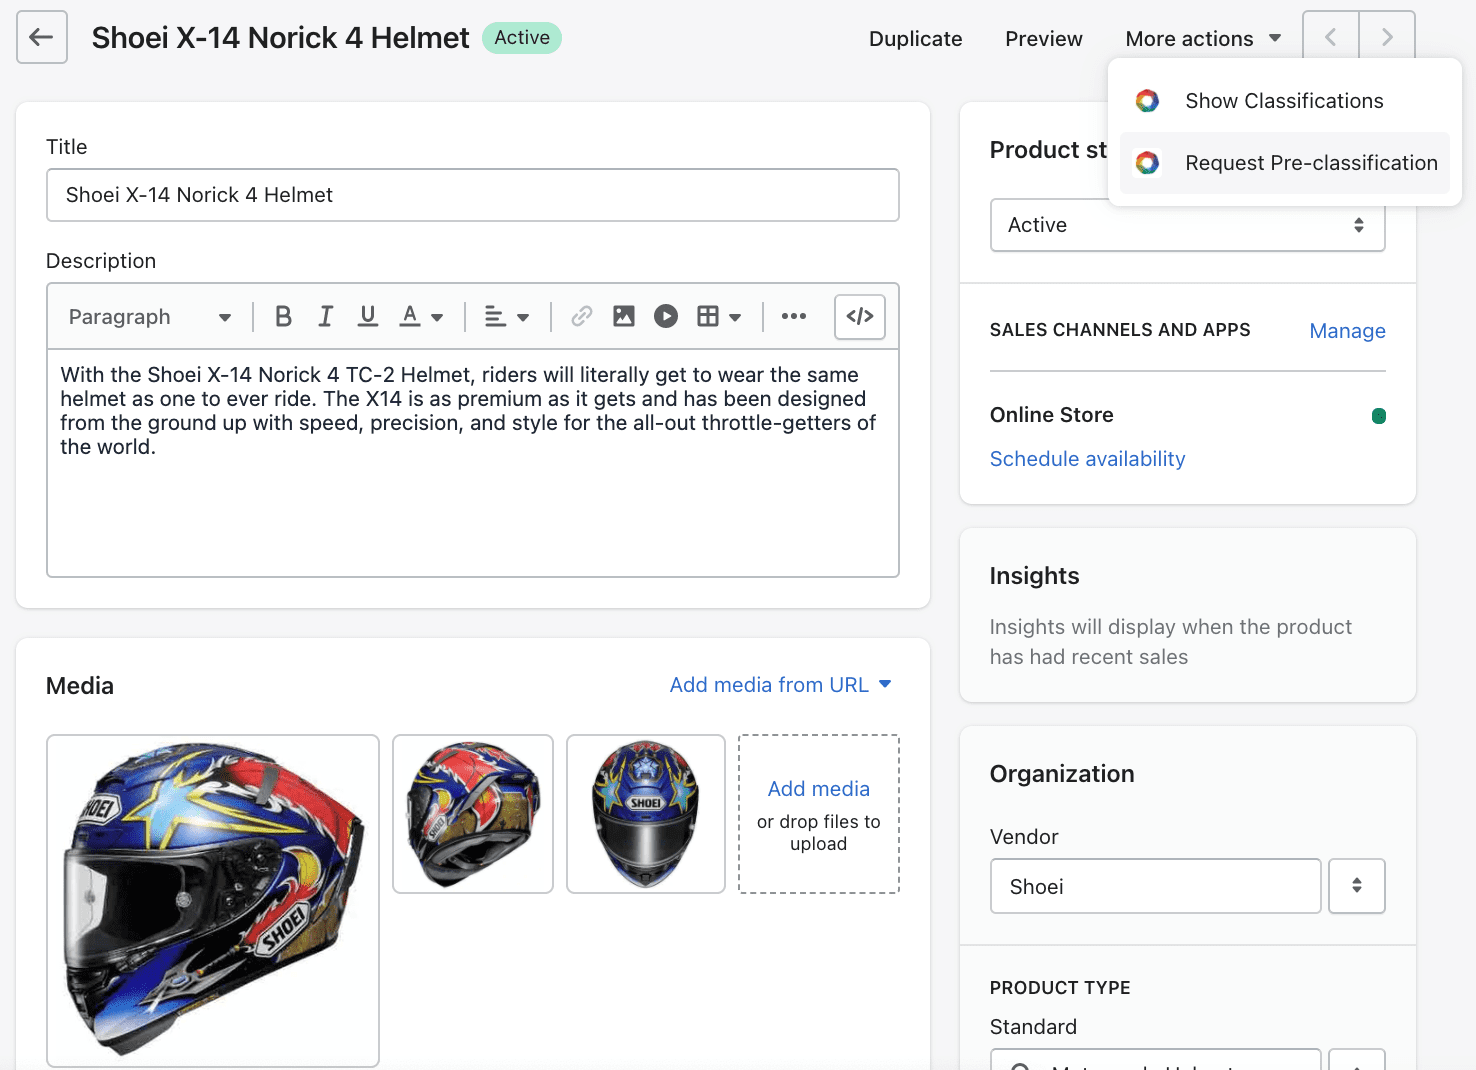
- Login to your Shopify admin store and with the EdgeCTP app already installed, click on left menu Products > All products choice

- Search for the product you wish to get classified, e.g., type a value in the search fields and then click on the Product’s name to open
- Click on the Product’s name to open the product details, and make sure that as much of the product details are completed as possible.
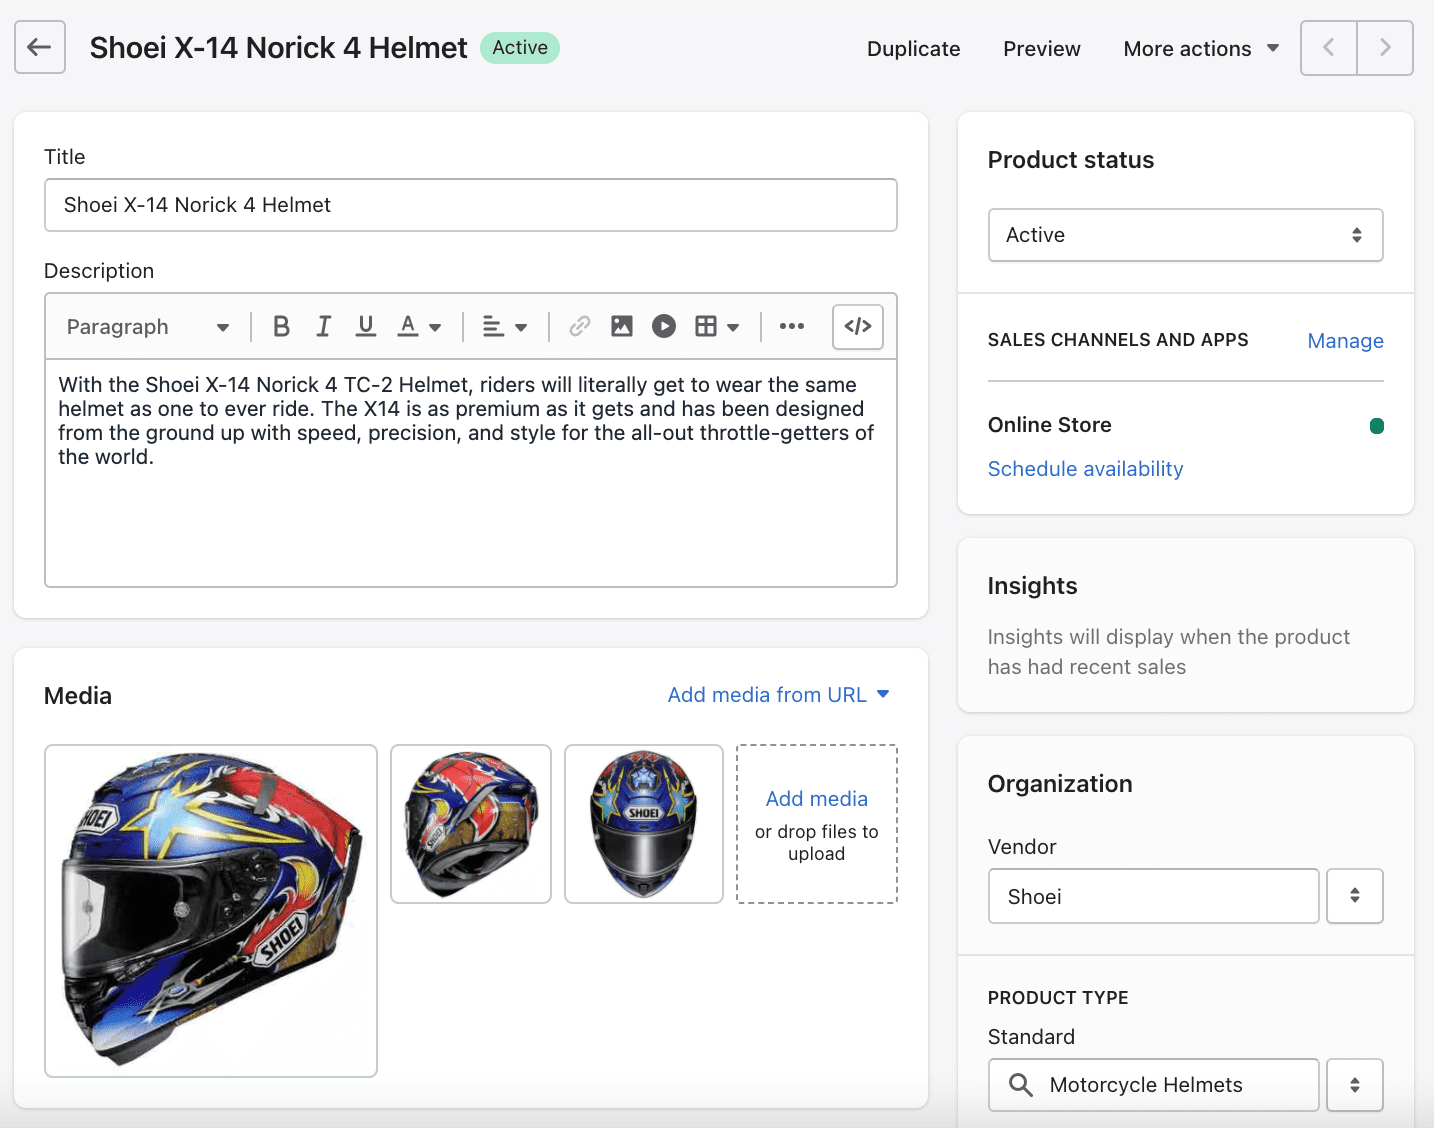
Ideally, the following product fields need to be completed for an accurate product classification:
- Title (Name)
- Description
- Vendor
- Product Type
- Pricing
- Inventory: SKU + Barcode
- Country of origin
- HS (Harmonized System) code – optional, only if you know it
If you make changes or add more details, then click the Save button to save the product details
- Choose from the product’s top right menu of More actions > Request Pre-classification
- Wait a few moments for the Request Pre-classification screen to appear and type in the Country/Countries your wish to export the product to. Providing the country/countries will enable the country specific fully qualified Tariff Codes to be applied to the product. Once all the country/countries have been entered, click the Request Pre-classification button
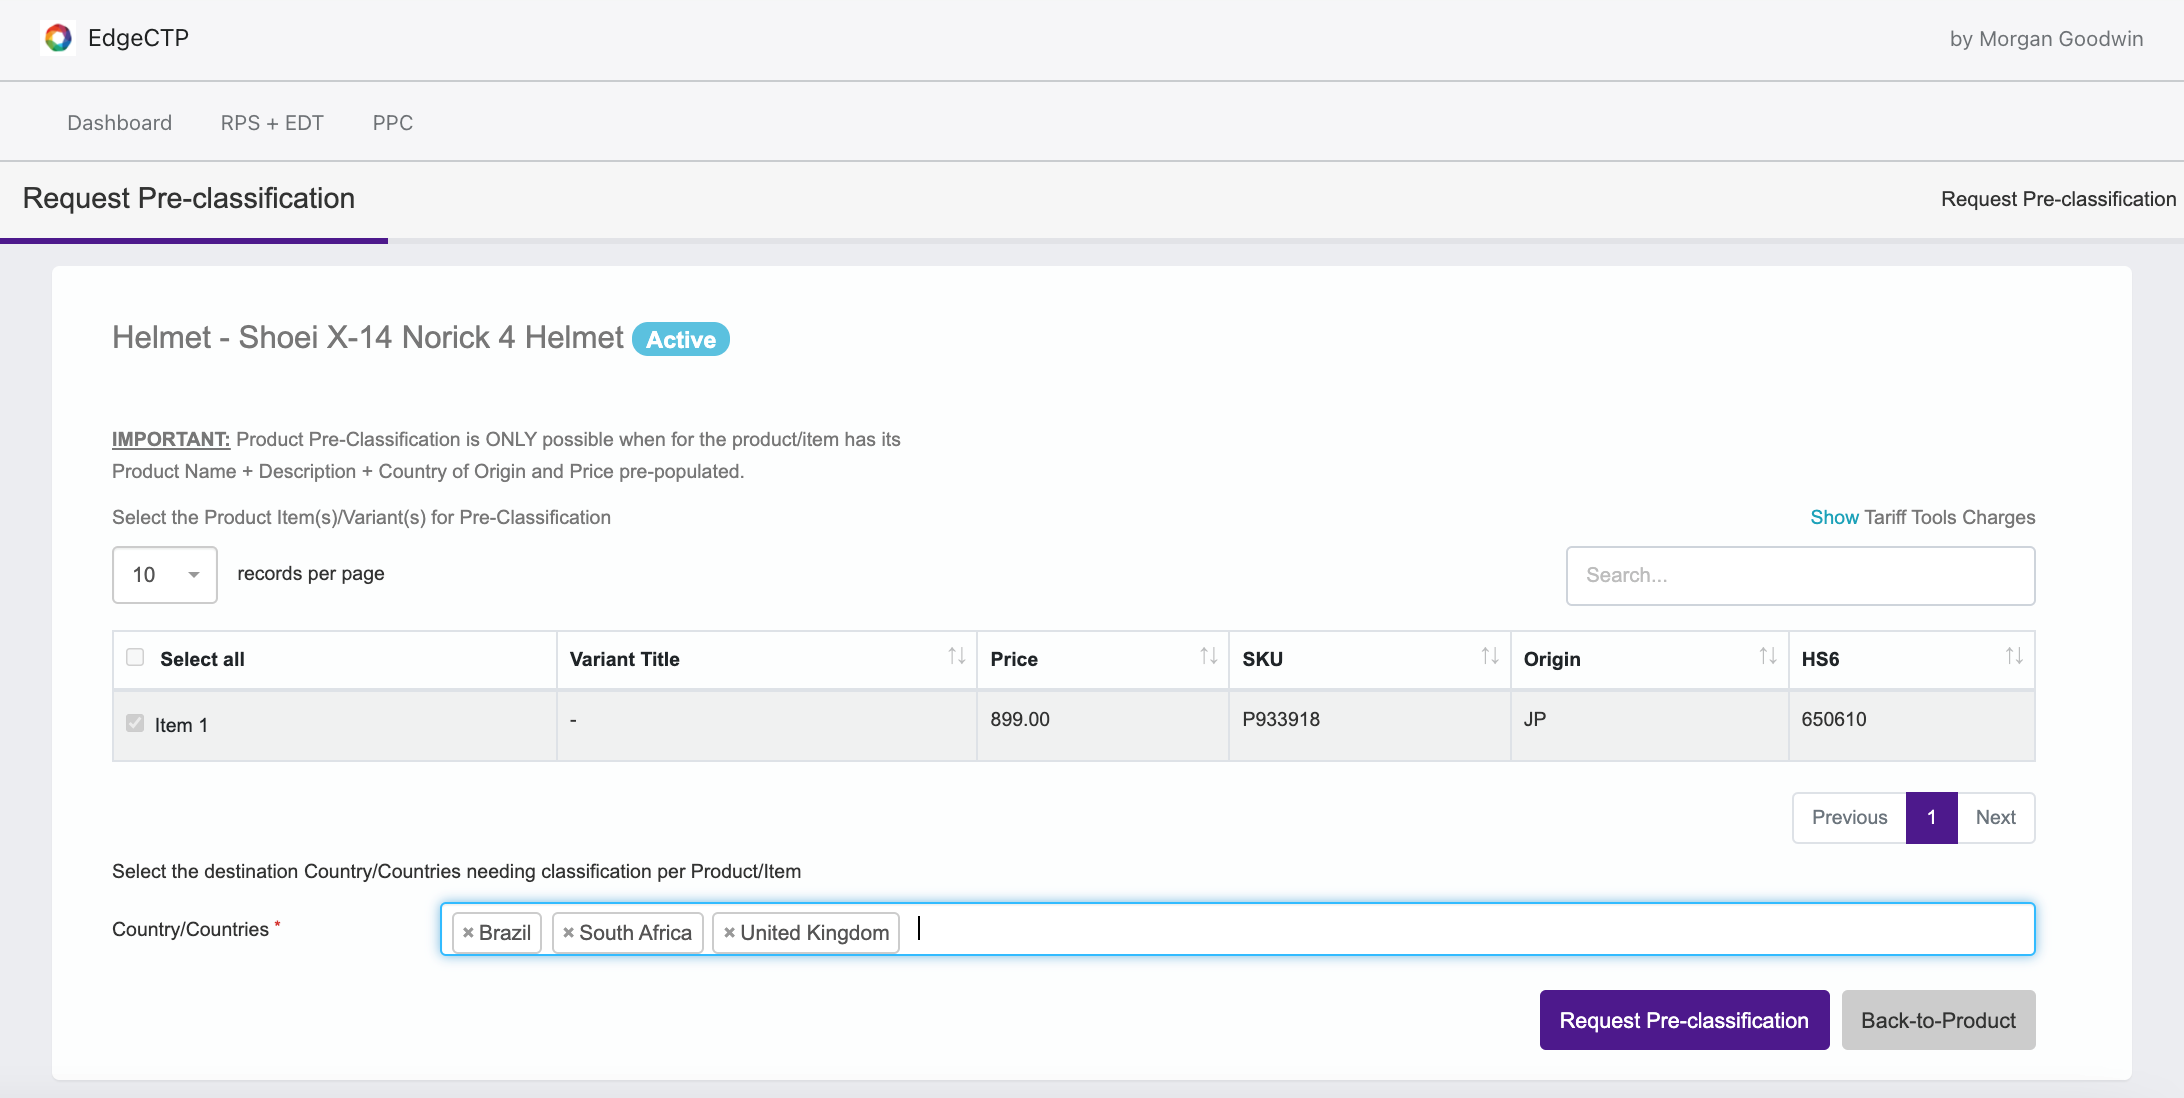
- Wait a short while and the Product Pre-Classification (PPC) table will appear show the product and its associated country/countries in a Stage of ‘Planned’ and a Status of ‘Unclassified’, which means your product is queued for classification.

Fee Saving Tip: When requesting PPC, you may want to pick more than 1 destination country because the cost (fee) for classifying subsequent countries are reduced, if presented at the same time as the first country. - You can wait for the analyst to classify your product(s) and notify you once the classification is complete. Alternatively, you pan to the right on the PPC table, where you’ll come across an Action column and you can click the Refresh Status action icon on the lead product/country row.

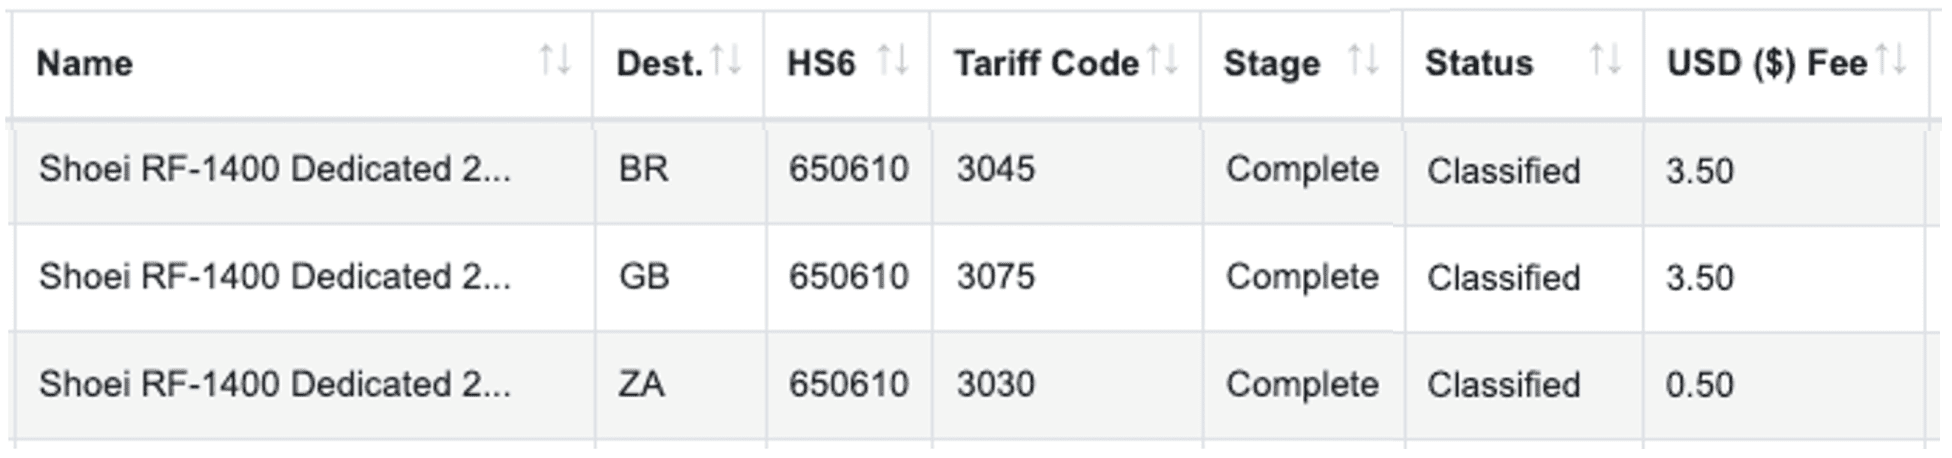
Note: It’s best NOT to repeatedly press the Refresh Status action (same etiquette as ringing a doorbell!), because you’ll get a notification automatically as soon as the in-person analyst has completed their classification of your product and country/countries combination. - Once the classification is complete you will get a notification and the Stage + Status fields will be set as Complete and Classified respectively
That’s it, you’ve now gotten your product classified.
Multi-selected Products Submission for Classification
If you’ve several products to classify (even to multiple destination countries at the same time), then you can perform the following five step from your Shopify store admin:
- From Shopify store admin, choose Products > All Products
- Select your first product using the checkbox on the left of the product image
- Select your subsequent product(s) using the checkbox on the left of the product image(s)
- Choose the More actions dropdown menu
- Select Request Pre-Classification menu choice
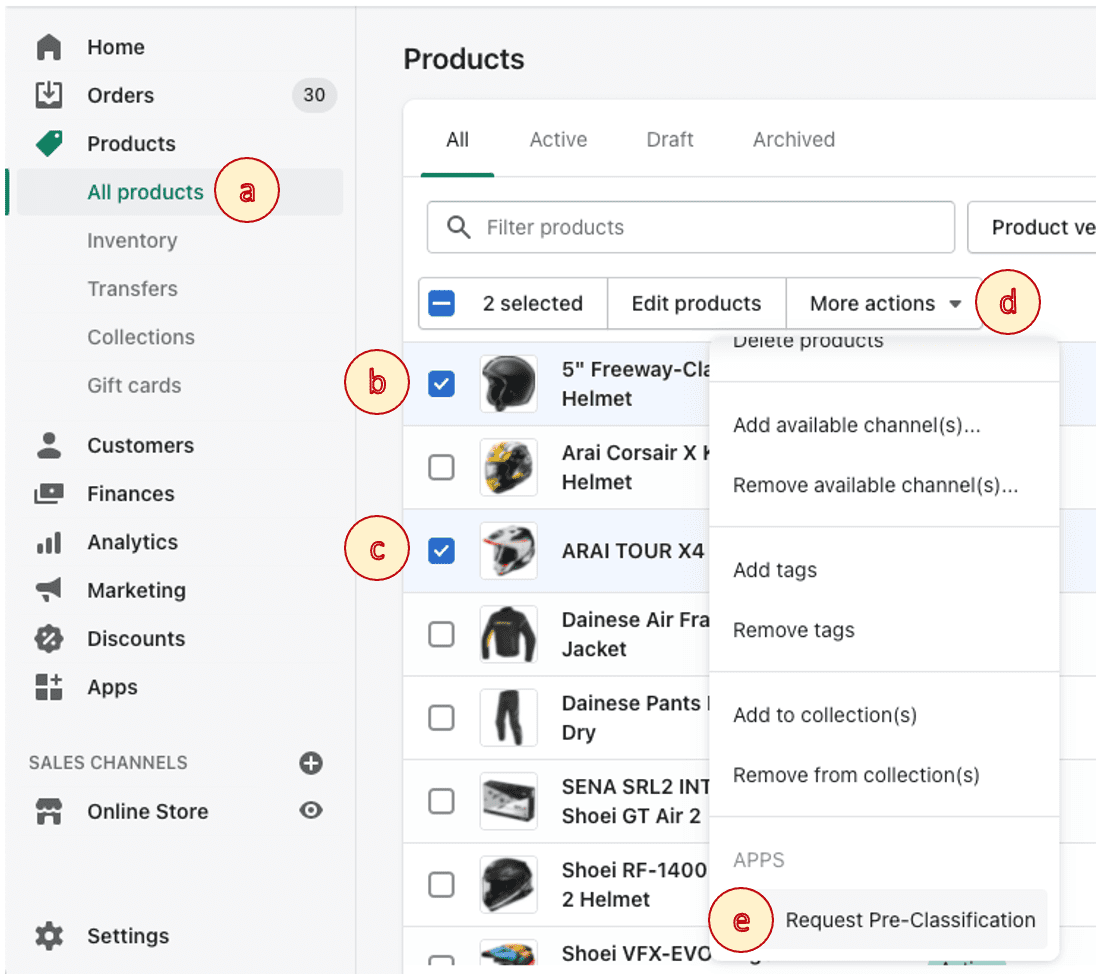
- When the Pre-Classification country table appears, add the Country/Countries, and click the Request Pre-classification button
- Perform the classification steps as per the single product classification request (above)
6. How a buyer knows Estimated Duties + Taxes (EDT) in the Shopify check out
This section assumes that you’ve already:
- Installed the EdgeCTP app into your Shopify store
- Signed-up/created or already have an EdgeCTP account
- Connected your Shopify store and EdgeCTP account
- Added your payment card and switched on the PPC, EDT + RPS services in EdgeCTP
The following steps are performed by your buyer, during the checkout process, for any orders that are going overseas/cross-border. The buyer is informed of the Estimated Duties and Taxes (EDT) associated with their order.
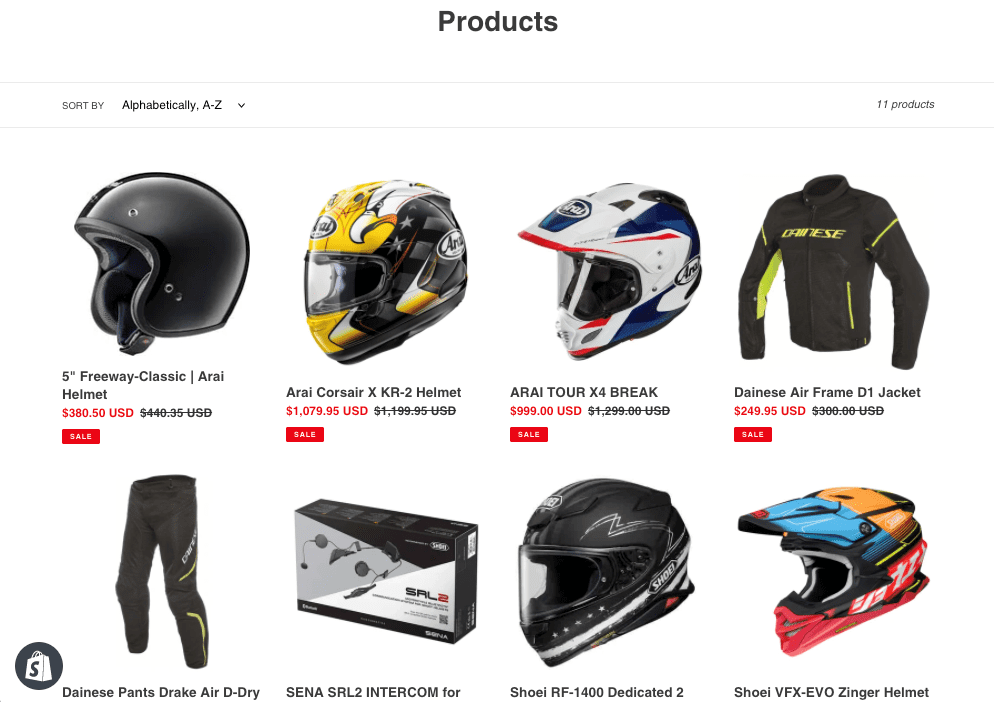
- Your buyer visits your online store (website) that is linked with your Shopify store.
If you want to try this out from your Shopify store admin, then click on the View (eye) icon for the Online Store in the Sales channel menu

- The buyer chooses and adds product(s) to their cart
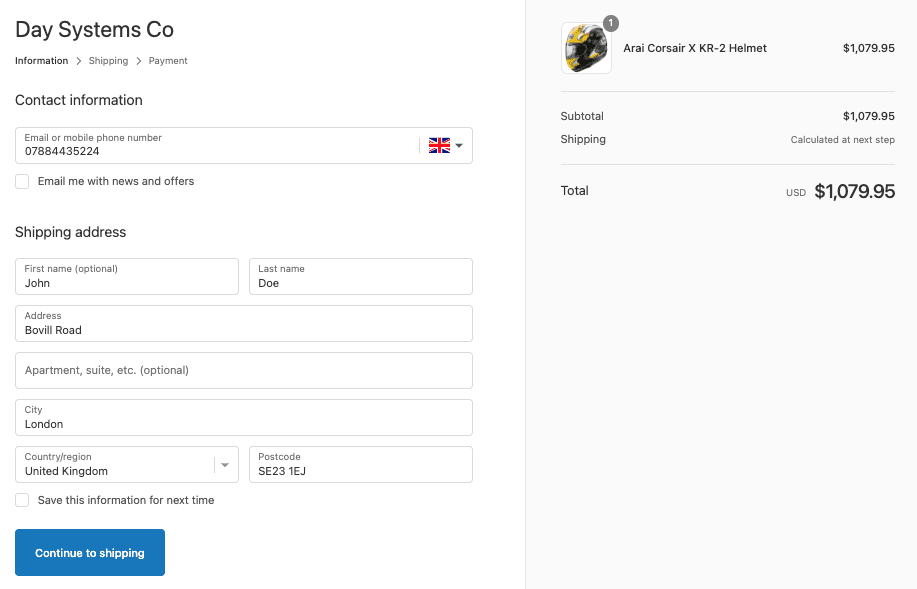
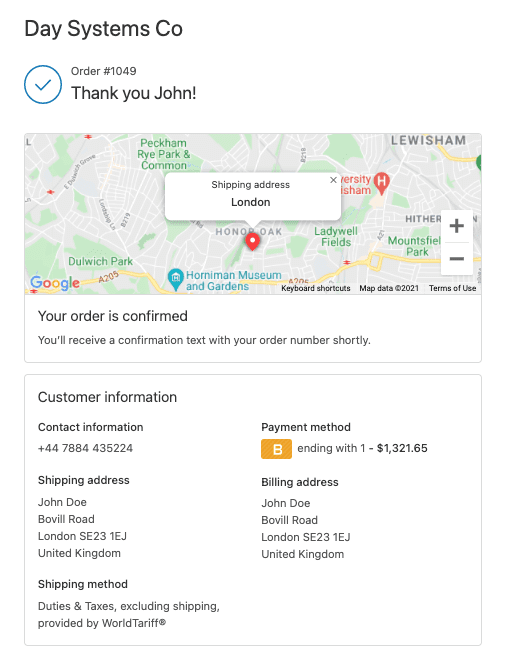
- The buyer goes to the checkout to pay for the selected product(s) and completes their Contact information + Shipping address and clicks the Continue to shipping notice that in this example the goods are being shipped from the USA to the UK (London)
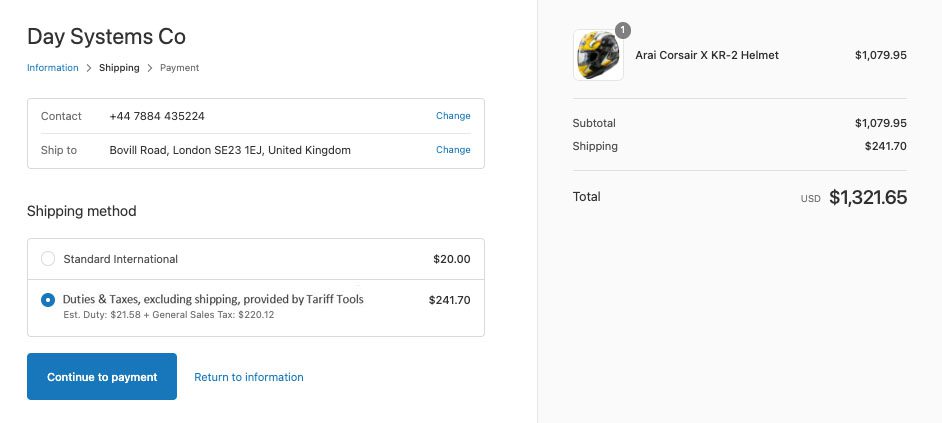
- Note that for the current release of EdgeCTP, the EDT functionality combines the Shipping with the associated duties + taxes to provide the buyer with a single figure for shipping and duties + taxes. The buyer selects the appropriate Shipping method, with the associated Est. Duties + General Sales Tax, and clicks the Continue to payment buttonNotice that in this example, for simplicity the Duties & Taxes line is shown separately, and appears in the Shipping line on the right panel above the order’s Total
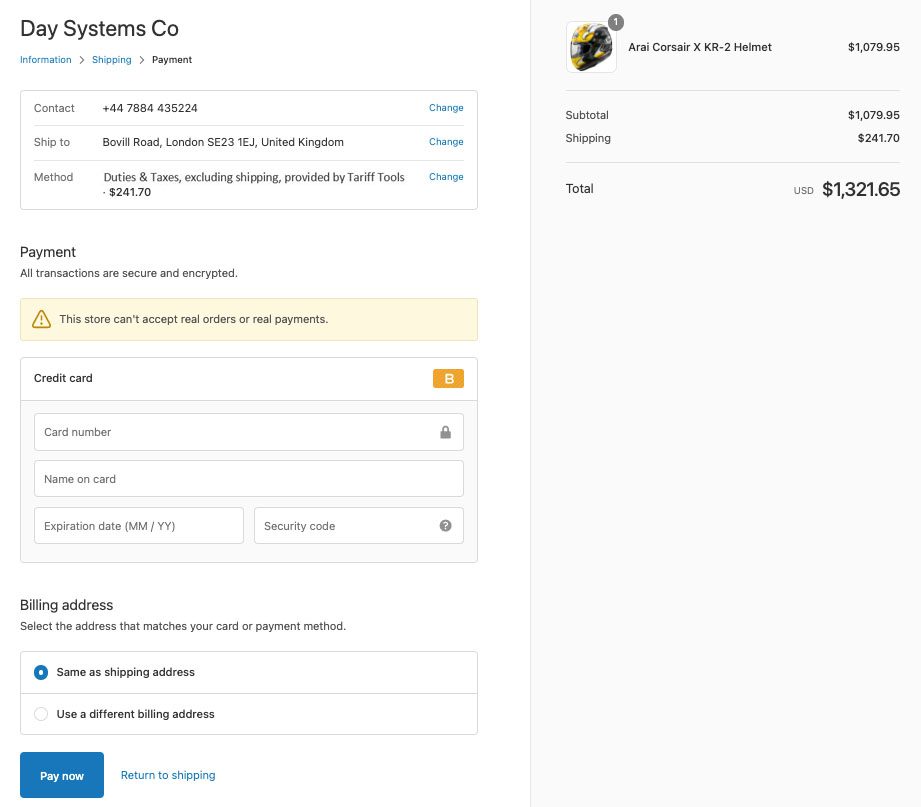
- The buyer then completes their Payment details and clicks the Pay now button, which creates the order
- If you wish, you can view the placed order in your Shopify store admin Orders menu
7. How to perform Restricted Party Screening (RPS) from within Shopify
This section assumes that you’ve already:
- Installed the EdgeCTP app into your Shopify store
- Signed-up/created or already have an EdgeCTP account
- Connected your Shopify store and EdgeCTP account
- Added your payment card and switched on the PPC, EDT + RPS services in EdgeCTP
The following steps show you how to use the Shopify store admin and check if there are any restrictions associated with fulfilling orders with a customer. That is, learn how to perform Restricted Party Screening (RPS) on a customer within Shopify.
- From within your Shopify store admin, choose Customers to show a list of your Shopify held customers.
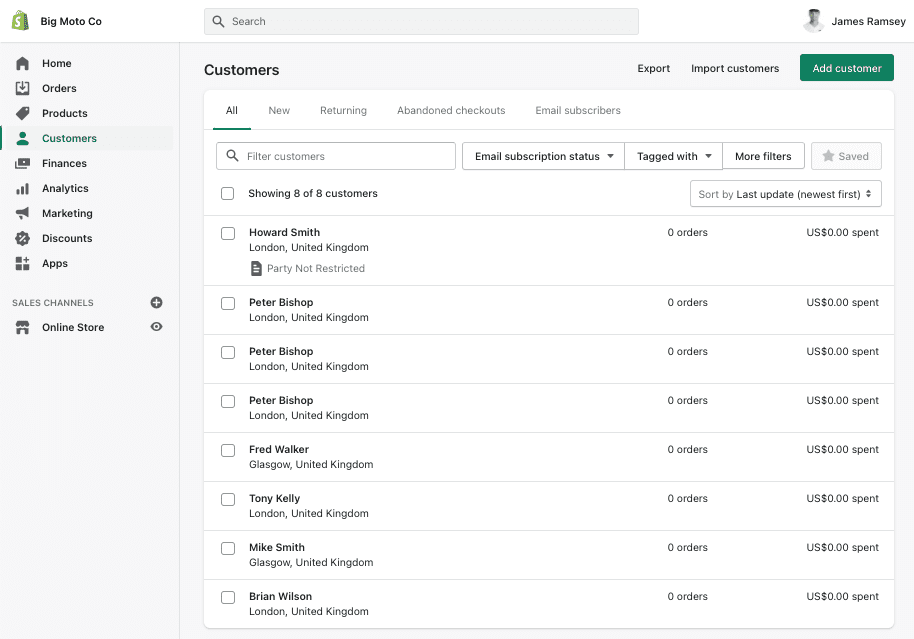 Notice that customers you HAVE performed RPS on have a note/tag with either ‘Party Not Restricted’ or ‘Party Restricted’. In this example, Howard Smith doesn’t have any restrictions
 - Select a customer you wish to perform RPS on by clicking on their name to open their details page
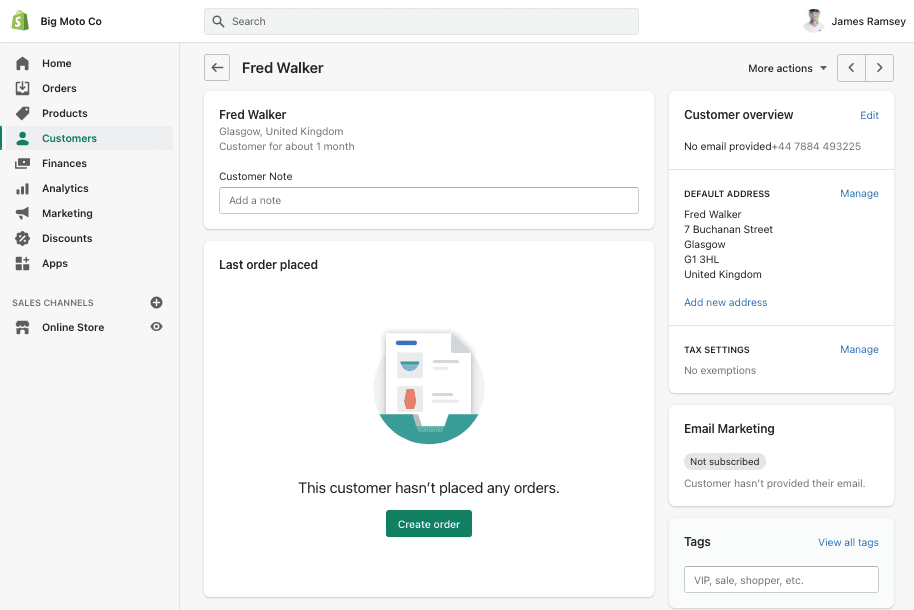 Notice that in this example, the customer ‘Fred Walker’ from Glasgow, UK has NO Tags or Customer Notes, i.e., this customer hasn’t had any RPS perform on their details
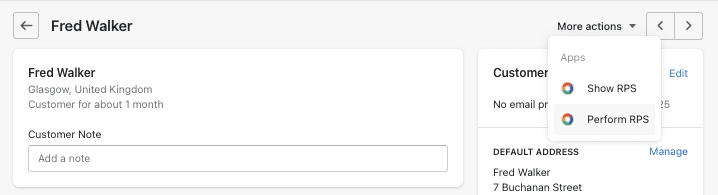
 - Choose More actions dropdown and choose the Perform RPS option
- Wait a few moments and the customer details will return with Customer Notes and Tags in 3 areas, indicating if there are any restrictions. In this example, Fred Walker has no restrictions
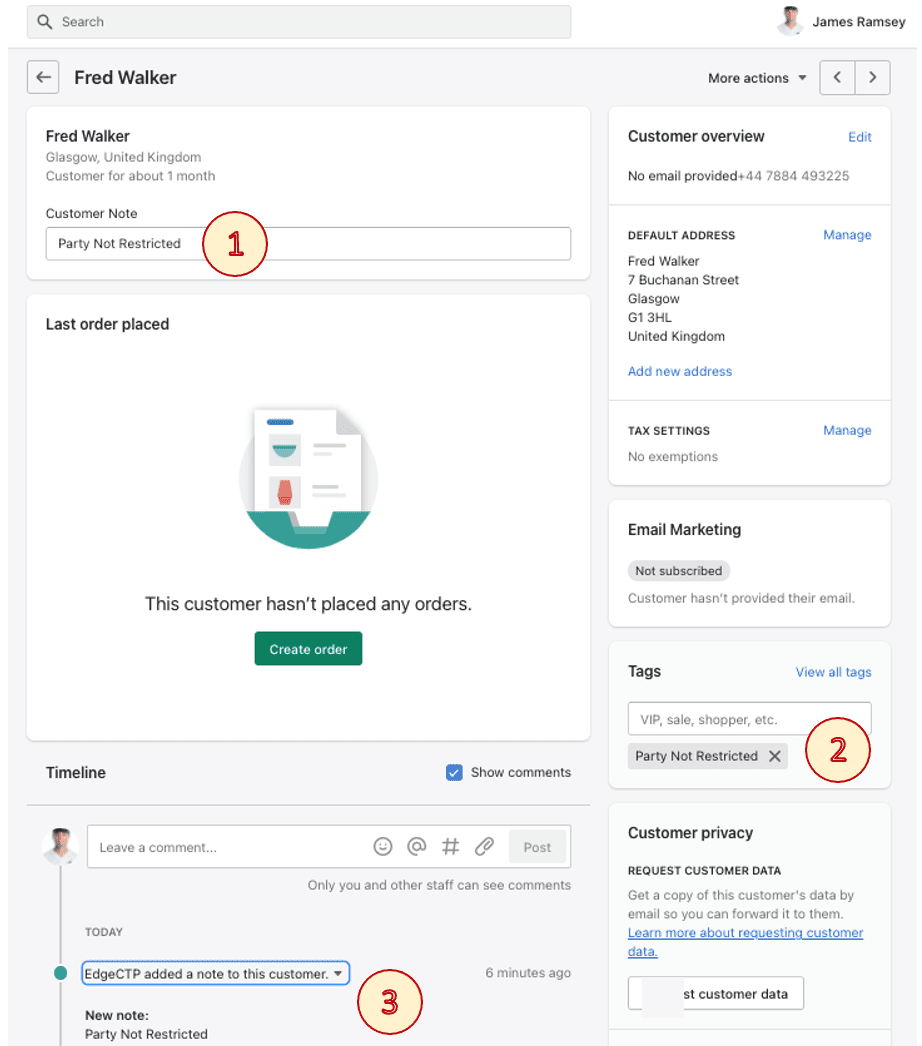
- The Timeline indicates the last time a customer was screened. It is good practice to perform RPS on the customer BEFORE you fulfil any order or send a consignment to them
8. How to check your Tariff Tools usage from within Shopify
This section assumes that you’ve already:
- Installed the EdgeCTP app into your Shopify store
- Signed-up/created or already have an EdgeCTP account
- Connected your Shopify store and EdgeCTP account
- Added your payment card and switched on the PPC, EDT + RPS services in EdgeCTP
Use the following steps if you want to see how much of the PPC, EDT + RPS services you have used from within Shopify.
- From within your Shopify store admin, choose Apps from the left menu
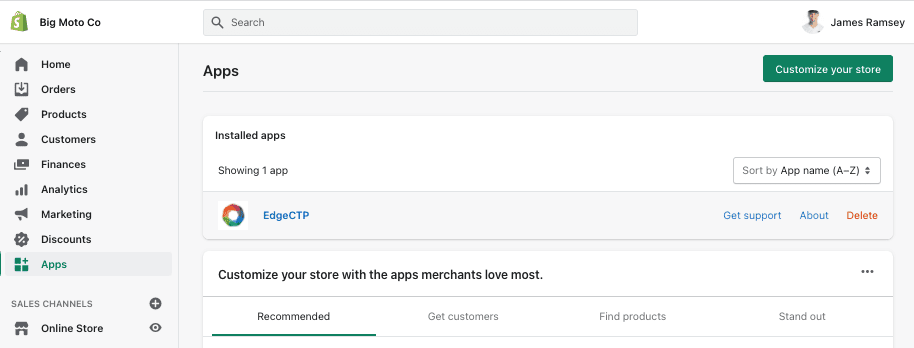
- From the Installed apps click on the EdgeCTP app name to open it
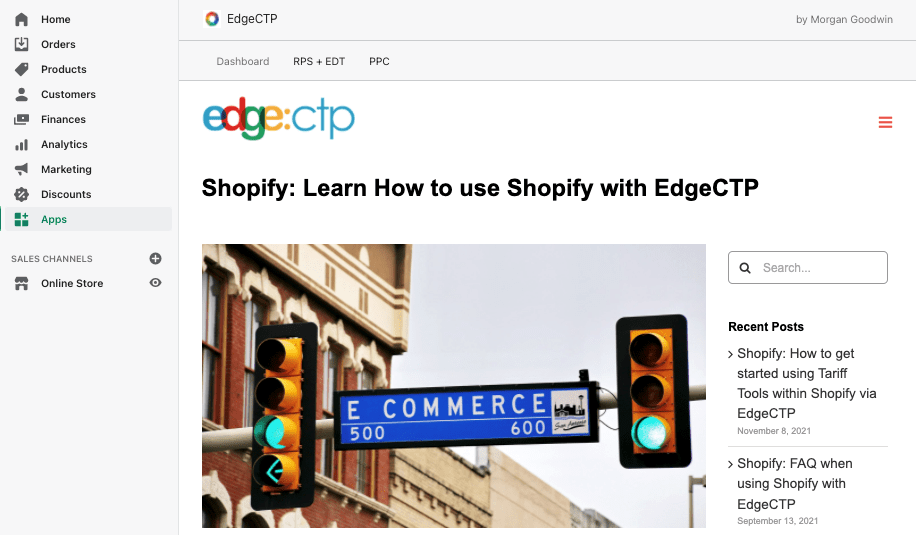
- From the EdgeCTP app (top) menu of Dashboard, RPS + EDT and PPC, click on:
- RPS+EDT to show the statement of use for these services
- PPC to show the statement of use for this service
9. How to check your Tariff Tools usage from within EdgeCTP
This section assumes that you’ve already:
- Installed the EdgeCTP app into your Shopify store
- Signed-up/created or already have an EdgeCTP account
- Connected your Shopify store and EdgeCTP account
- Added your payment card and switched on the PPC, EDT + RPS services in EdgeCTP
Use the following steps if you want to see how much of the PPC, EDT + RPS services you have used from within EdgeCTP.
- Login to your EdgeCTP account and choose from the top left menu Administration > Settings > Customs > Tariff Tools
t - PPC is available in the top section and EDT + RPS is listed in the lower table
Leave a Reply