
In this post, you’ll learn how to create a European Community (EC) Certificate of Origin. We’ll demonstrate by using the FREE online application EdgeCERTS, which is part of the EdgeCTP suite of tools.
Onetime Setup: Get Started with the FREE online EdgeCERTS
If you’ve NOT already up and running with EdgeCERTS or EdgeCTP, then FIRST Sign-Up and Get Started with EdgeCTP (in 2 minutes).
Annually: Valid Formal Undertaking
You will need to have a valid (in-date) Formal Undertaking in place with your chosen Chamber of Commerce. If you don’t have one, then FIRST create + send a Formal Undertaking to a Chamber of Commerce.
Decide: Certificate Type of Standard or Express
Before you get started, you must decide the certificate type you need. There are two certificate types:
1. Standard Certificate
Here you’ll complete the certificate application online (using EdgeCERTS) and submit it to the chosen Chamber of Commerce. The Chamber will then: check, print and manually certify the certificate (using wet ink stamps + signatures), before posting it back to you. Sometimes you can collect the certificate, however, check with the Chamber that collection is possible before trekking out.
IMPORTANT: If your client wants a certificate with ‘wet ink’/manual stamps + signatures from the Chamber of Commerce, AND/OR the certificate needs to be ‘legalized’ (i.e. stamped by an Embassy or Consulate) then you need to choose this Standard Certificate option.
2. Express/ Electronic Certificate
You’ll FIRST need to have a blank paper certificate in your possession, which you’ve pre-purchased from your chosen Chamber of Commerce because you’ll ultimately be printing the certificate by yourself. If you DON’T have this blank paper certificate, then either contact the Chamber and get one, or switch to the standard certificate (above).
When doing an Express Certificate, you’ll complete the application online (using EdgeCERTS) and submit it to the chosen Chamber of Commerce. The Chamber then checks the submitted certificate application and electronically certify, by placing a digital QR code + signatures + stamps on the certificate (i.e. NOT wet stamps nor wet signatures), before returning the certificate back to you (electronically within EdgeCERTS); therefore, Express certificates are considered as ‘Electronic certificates’.
Additionally, you may come across ‘Premium Express’ certificates, which are the same as Express certificates, except that the Chamber processes them in a shorter time frame, usually with a 1-hour turn-around. Once the chamber returns the digitally certified certificate in EdgeCERTS, you print it locally on your pre-purchased blank certificate paper.
IMPORTANT: Only use this method if your client will accept certificates with digital certifications (QR code) and signatures (i.e. NOT wet ink stamps) AND the certificate does NOT need to be legalized by an Embassy or Consulate.
What You Need Before Applying For A Certificate Of Origin
1. Commercial/Export Invoice
You must provide, with the application for a certificate, a Commercial or Export Invoice. The Commercial Invoice proves who the consignor + consignees; the commercials of the trade being conducted, and the goods involved (learn what is a commercial or export invoice).
2. Proof of Origin
If you are NOT the manufacturer of the goods, then provide details on the goods manufacturing process + origin of materials used to confirm that the goods are of European Community Origin. There is an Origin Analysis tool built into EdgeCTP if you are using the Product Bill-of-Materials (BoM) functionality. For more information on EdgeCTP’s BoM functionality. See:https://www.edgectp.com/xtra/
3. Packing List
If the Commercial Invoice (you’re supplying with the Certificate application) does NOT have details of the packing, then you will need to provide/attach a Packing List with the application. EdgeCTP lets you create a Packing List, which you can attach to the certificate application.
4. Letter of Credit
If the trade is supported with a Letter of Credit (LC), then the LC needs to be provided with the Certificate application. You can get an LC from either the buyer, the buyer’s bank or directly from the bank extending the credit facility for the trade.
You’ll need the above, EVERY TIME, to support a certificate application.
How to complete an EC Certificate of Origin Application in EdgeCTP
Use the following steps to complete and apply for an EC Certificate of Origin, using EdgeCERTS (or EdgeCTP).
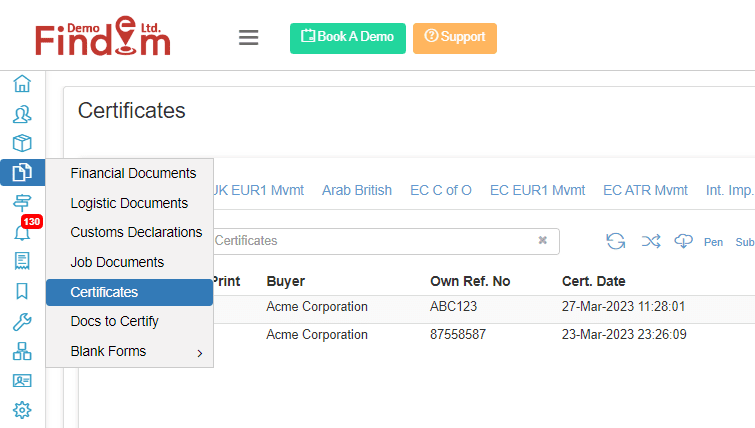
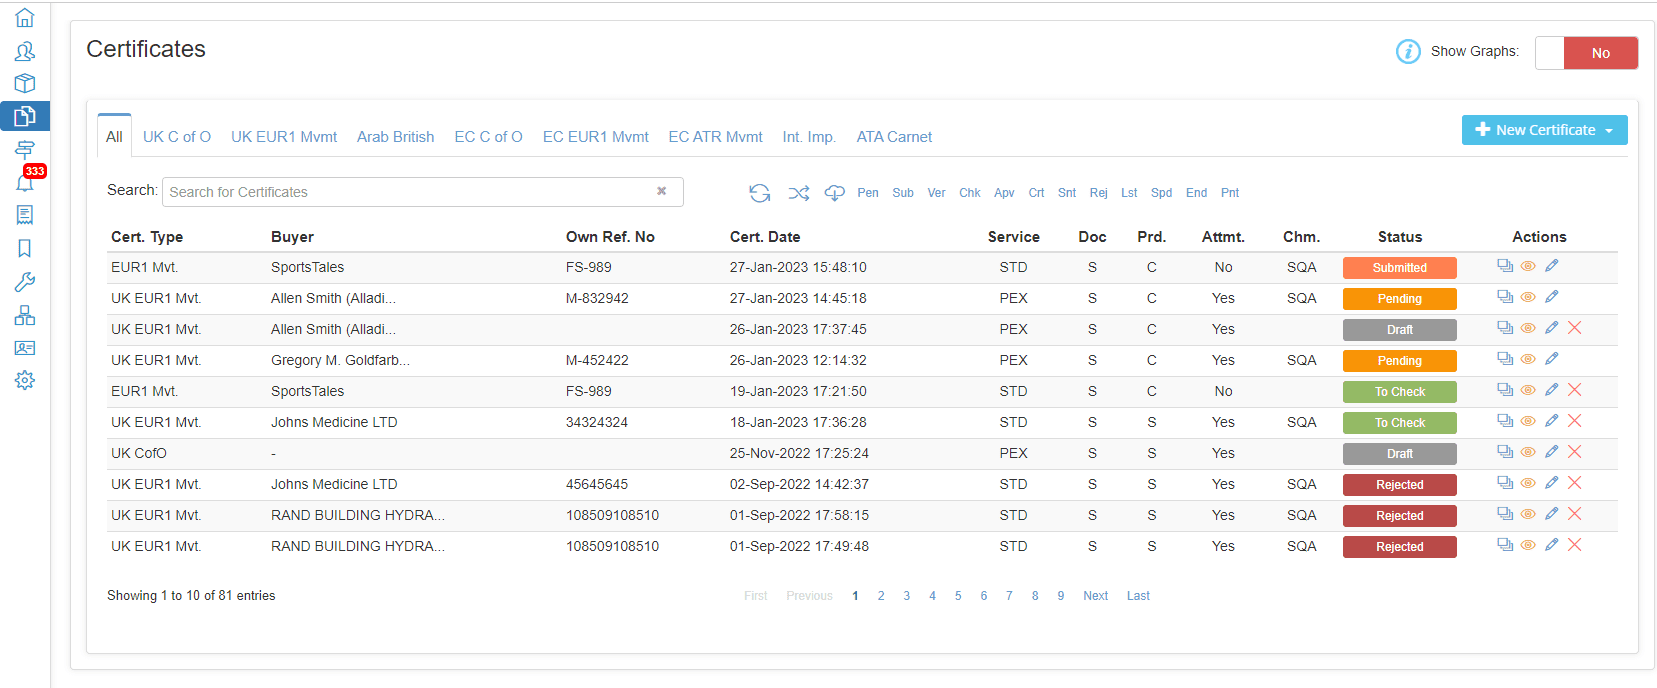
- Login to EdgeCTP (or EdgeCERTS) and make sure you can see the Docs-n-Certs menu option from the Home dashboard.
- Click on the Docs-n-Certs tab at the left and choose Certificates from the menu.
- From the Certificates dashboard, click on the ‘+ New Certificate‘ > EC Cert of Origin and choose either the Standard or Express (or Premium Express) Certificate Type (see above section in this blog to understand the differences). For this example, we’ll choose Express (so we can see how to self-print a certificate too).
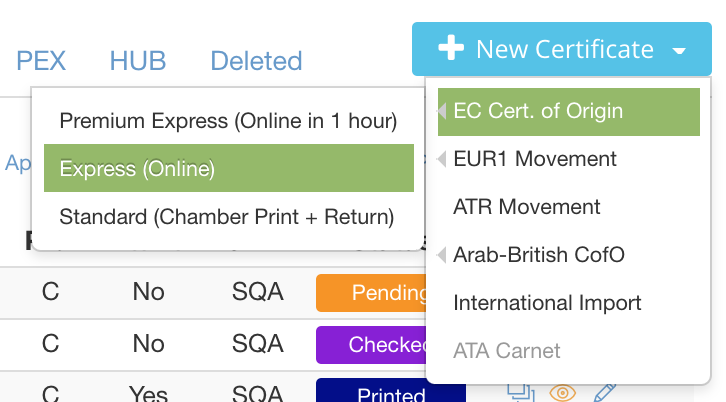
- If a Confirmation dialog box appears (because you chose Express or Premium Express), then read it and make sure you’re in compliance with the requirements and then click the [Proceed] button.
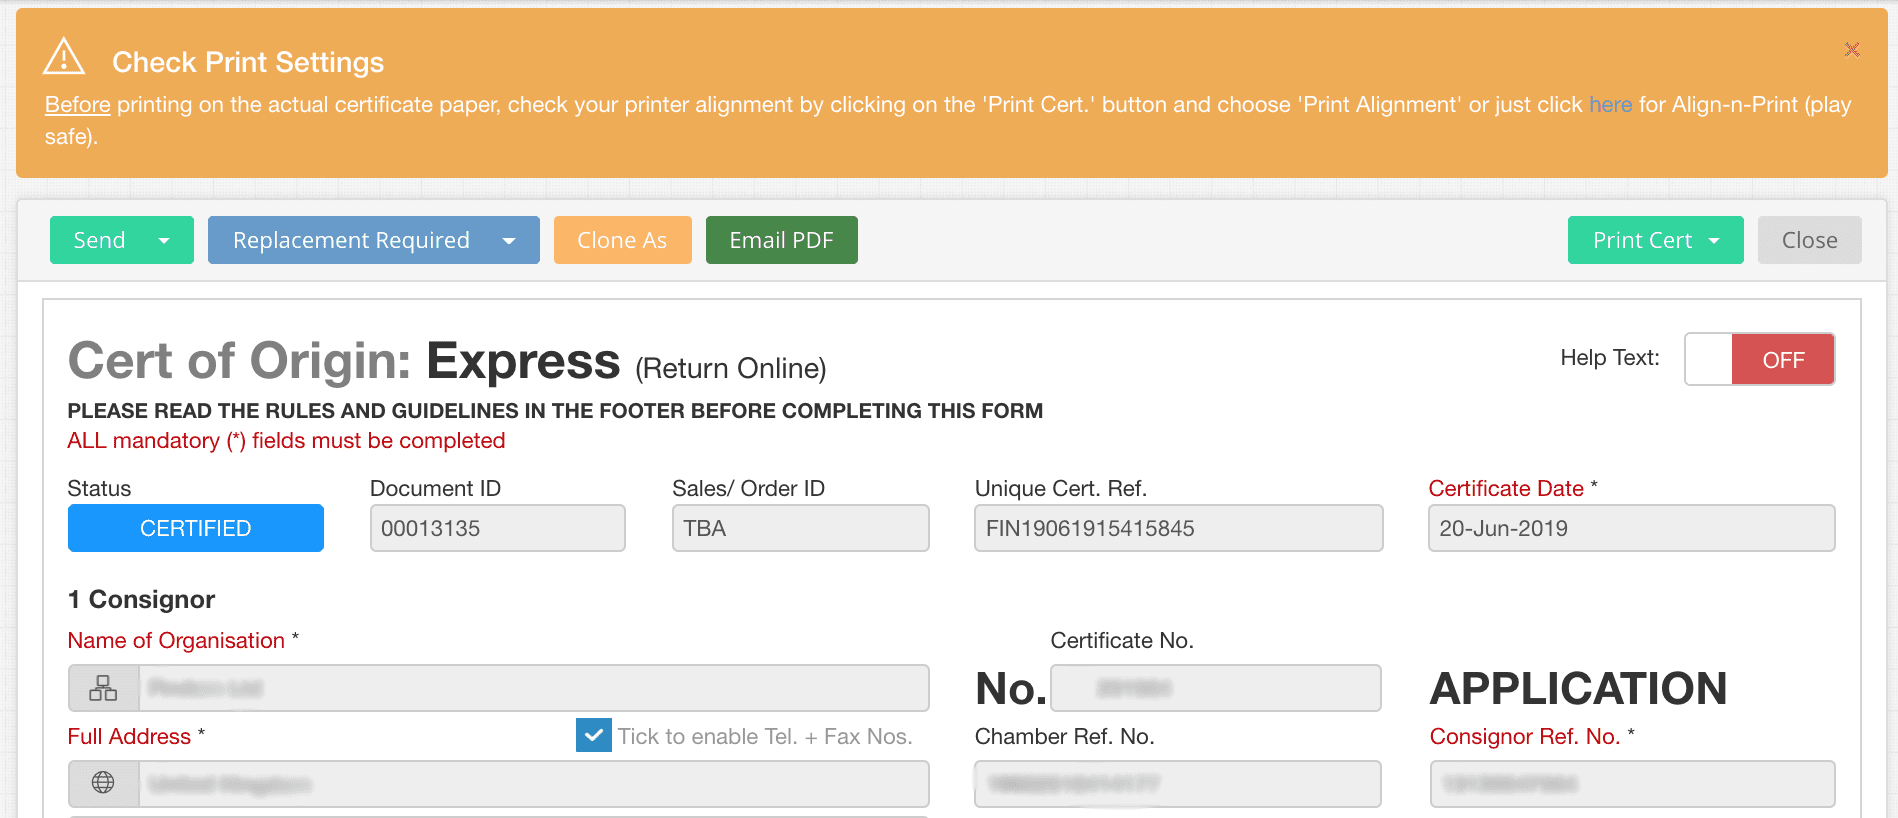
- The certificate application form will appear, and depending on the certificate type, a couple of message boxes will appear on the top of the application form for your consideration.
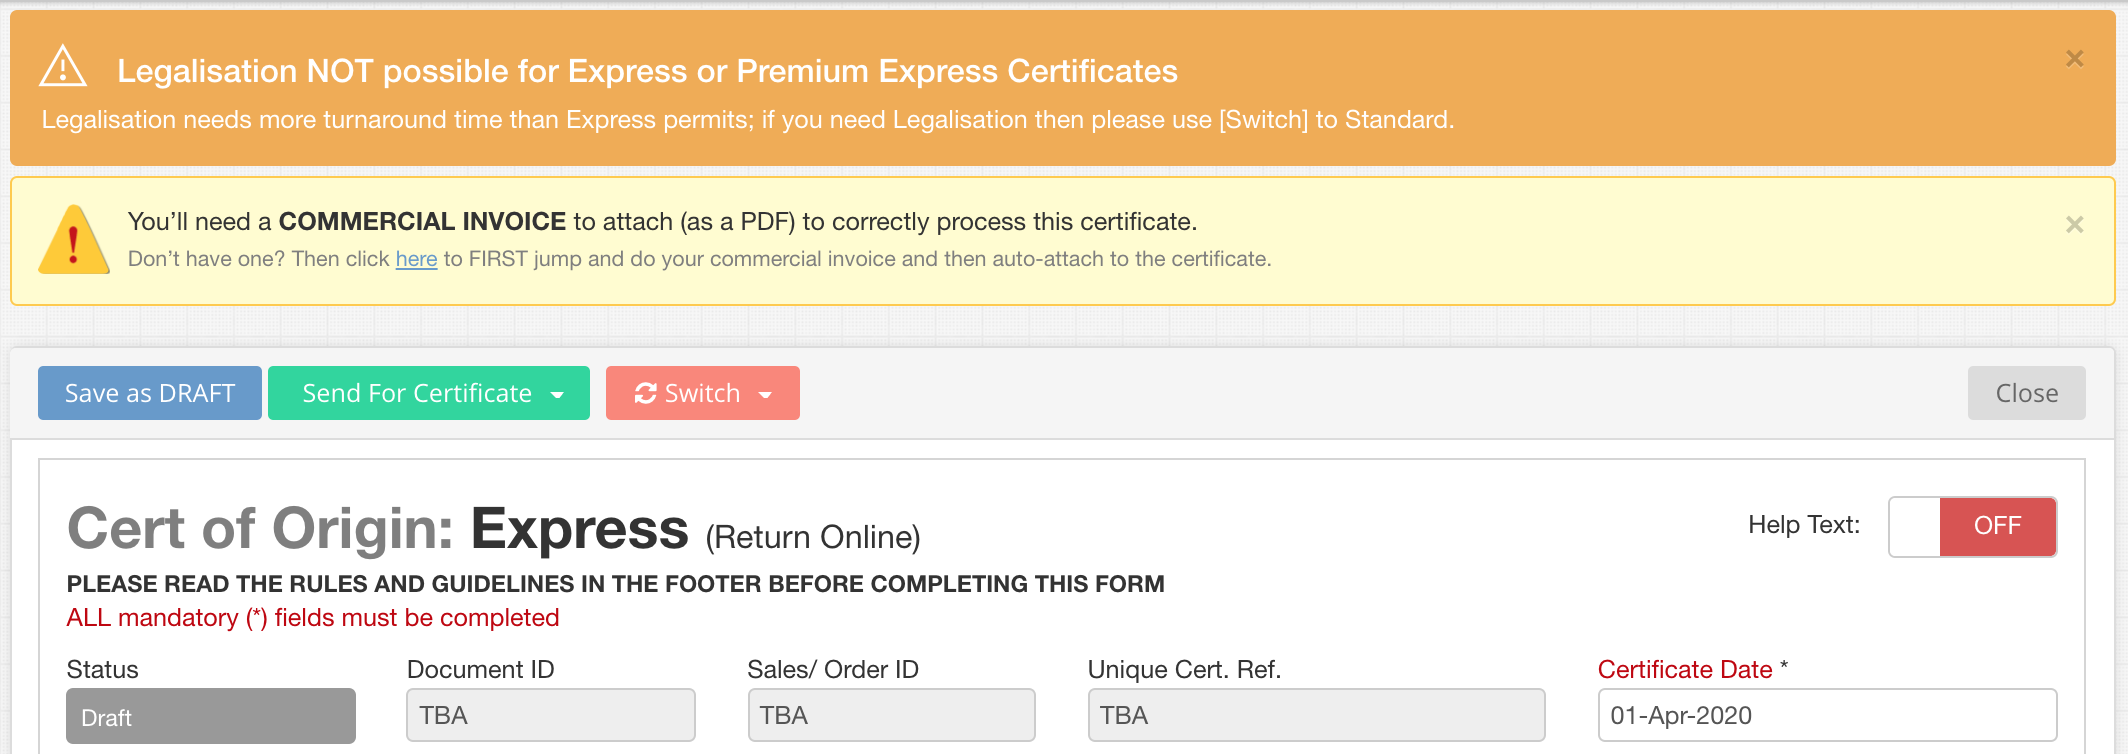
- If you’ve NOT gotten a Commercial Invoice (in PDF format) to attach to the Certificate application, then now is the time to click on the ‘here‘ link in the message box, and go and create the Commercial Invoice first.
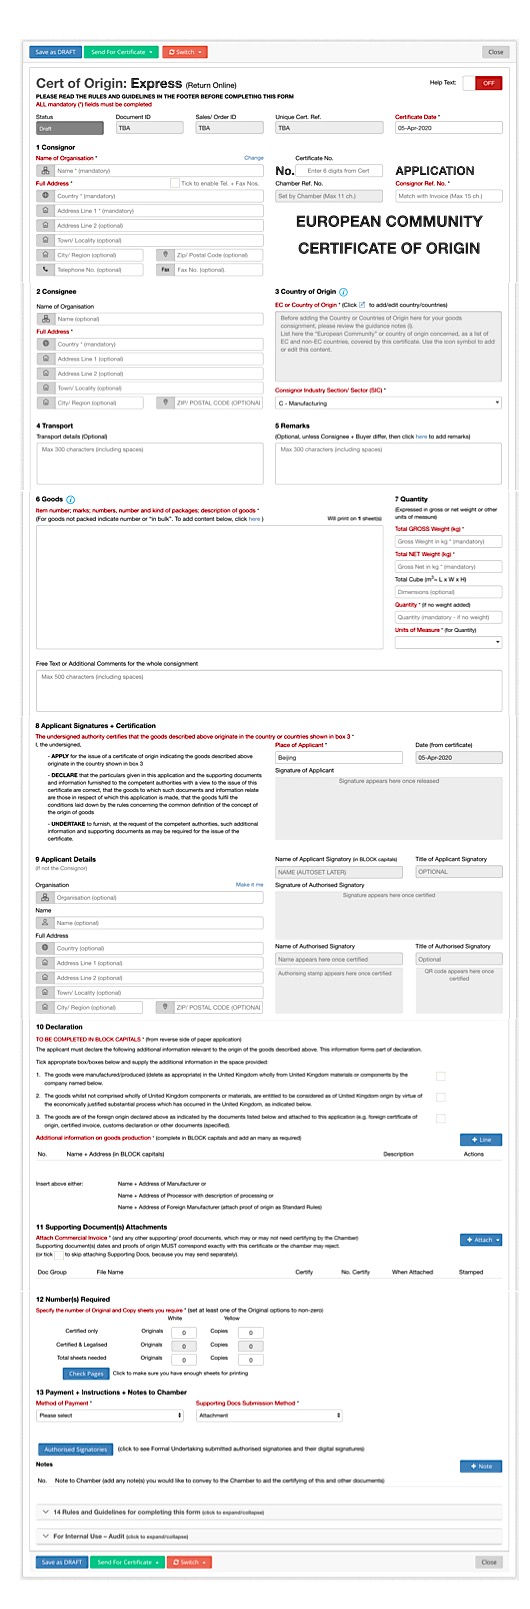
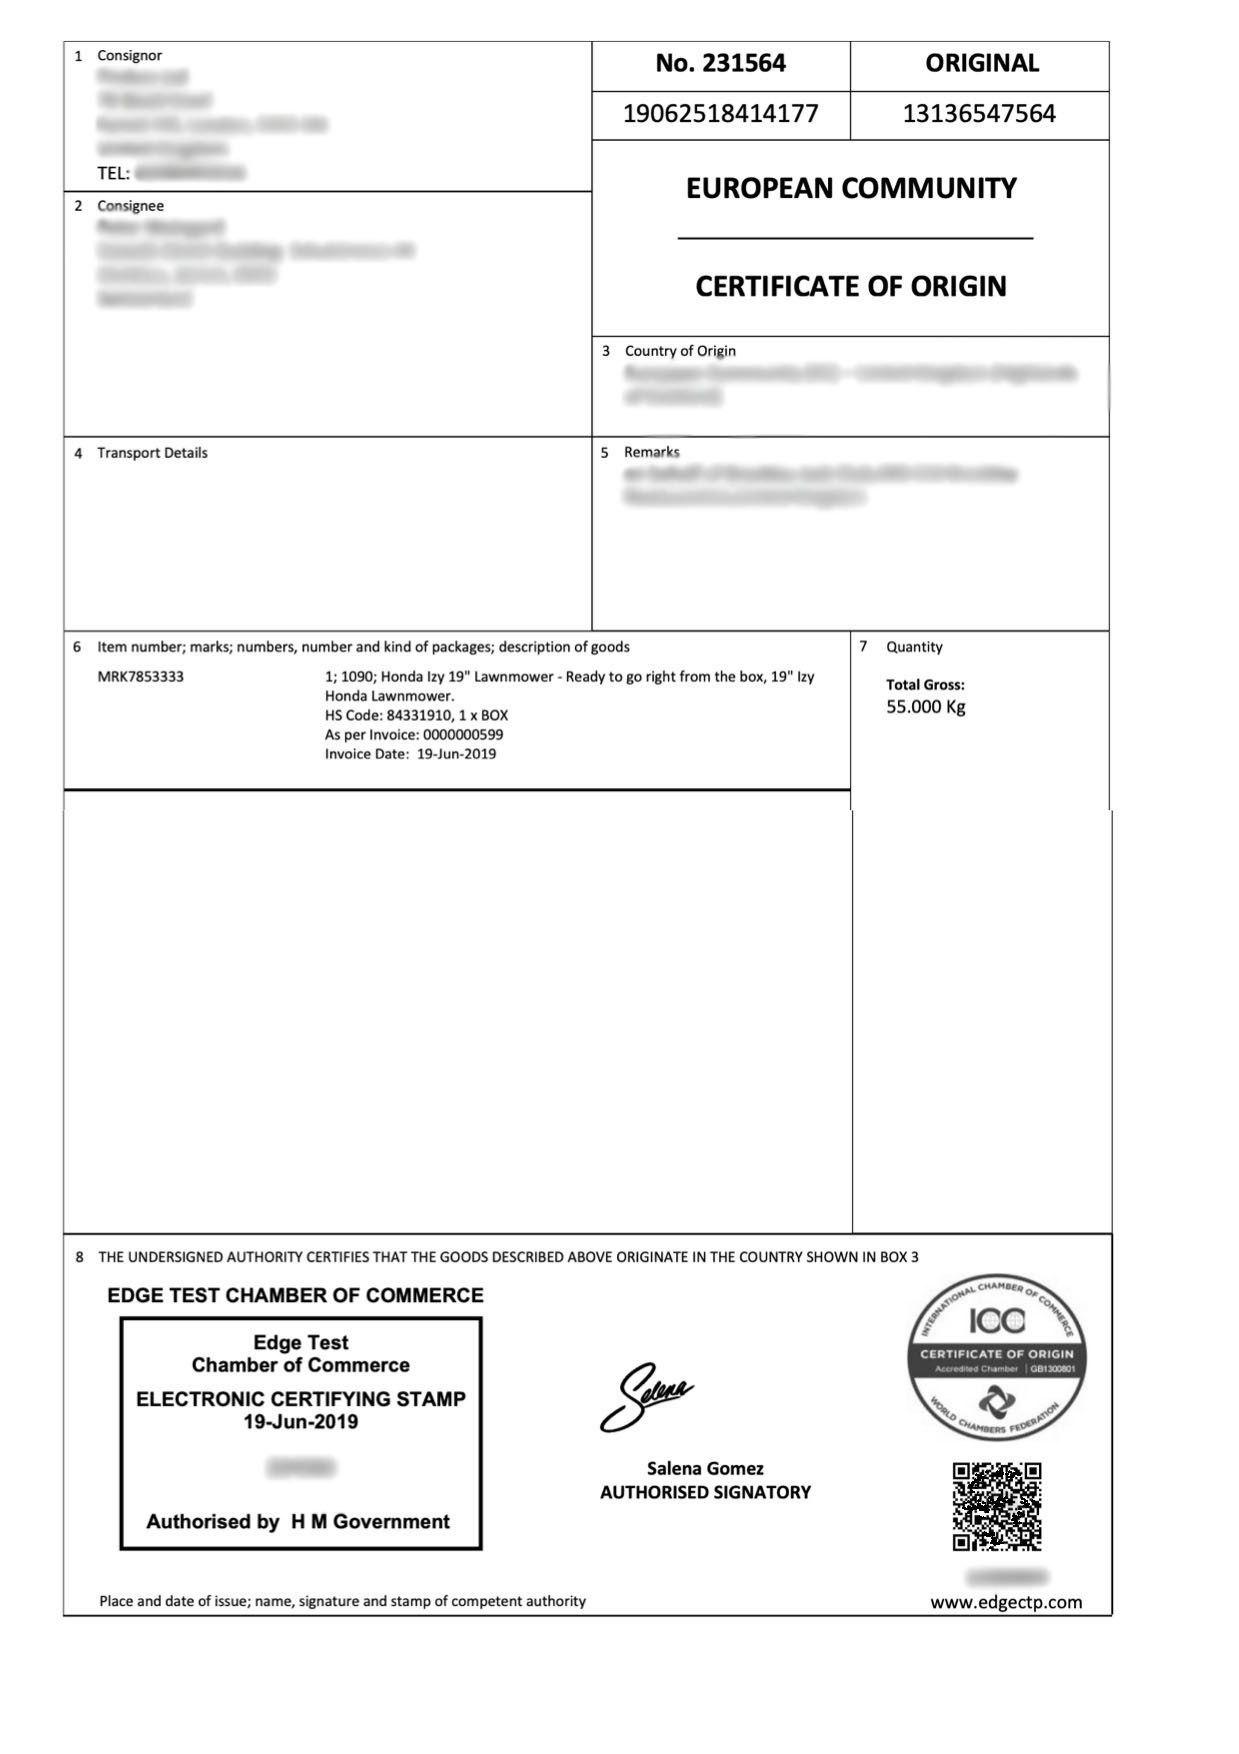
Example Digital Online EC Certificate of Origin
The following is a digital online EC Certificate of Origin as found in the EdgeCTP + EdgeCERTS system:
How To Filling-In A EC Certificate of Origin Online
All mandatory fields (red text and suffixed with an asterisk) must be completed and a Commercial Invoice attached as a minimum. Here’s guidance on the key pieces of information you should provide when filling-in a certificate of origin application:
- Certificate Date – usually set to the current date, and states the date you want to set as the date the certificate was issued; you can set to a past date but not a future date. If you set it to a date in the past then you’ll need to provide a back-dating indemnity with the application.
- Consignor Ref. No. – add any number you want to attribute to this certificate application and is usually a number associated with the trade being performed e.g. sales or order or invoice number.
- Box 1 Consignor – add your firm’s name and address (i.e. the exporter’s details).
- Box 2 Consignee – add your buyer’s firm name and address or the one receiving the goods (i.e. the importer of your goods).
- Box 3 Country of Origin – add the country origin of the goods being exported and if the country is from the European Community e.g. ‘European Community (EC) – Germany’ (just saying Germany is NOT acceptable).
- Consignor’s Industry Sector Code (SIC) – add the industry in which your business operates (i.e. the exporter’s industry sector e.g. manufacturing).
- Box 4 Transport – Optionally, state the primary method of transport used to deliver your goods. DO NOT specify specific vessels/vehicles/craft; just keep it brief e.g. airfreight.
- Box 5 Remarks – Optionally, add here any information NOT provided in other areas of the certificate application and you feel are relevant to be shown on the certificate e.g. Purchase Order number, letter of credit reference, etc.
- Box 6 Goods – You MUST add the following details about the goods being consigned in this box: ‘Item Numbers‘ is just a counter/line number of the goods descriptions you intend to show in this box e.g. 1, 2, 3, etc.; ‘Shipping Marks‘, which are the marks on the consignment delivery pack(s) being sent, and since most have an address on the pack(s), you could simply say: “As Addressed” or “Fully Addressed To Consignee” or “No Marks” (only if in the unlikely event the pack has no identification marks); ‘Numbers, Number, and Kind of Packs‘ + ‘Description of Goods‘, you just need to provide a general description of the goods, their packaging, and overall quality. Do NOT make this an exhaustive list, NOR a technical part-by-part description; just provide a summary that most people reading the description could understand the type of goods within the packages and their intended use. Ideally, you should include: a) Product Name, b) Manufactured or Obtained; c) HS Code (8 characters), and d) you MUST reference the commercial invoice number + date, e.g. “1001; Motorcycle gearbox; HS Code: 84011000; Manufactured As per Invoice No. 9543 dated 01-Jan-2020“. The EdgeCTP system will ‘rule-off’ any unused space within this box as security to prevent information from being added at a later date.
- Box 7 Quantity – Add the weights (either gross or net) in kilograms/metrics or other units of measure.
- Box 8 Application Signatures + Certification – read the terms + conditions, then: a) add your signature, which MUST correspond to the signature(s) found on the Formal Undertaking submitted and approved by the Chamber of Commerce. Since EdgeCTP submits your application electronically, you’ll need to place in this box a clearly human-readable, black signature on a transparent or white background and making sure it’s not touching the sides. You can upload a signature from a file on your computer/device; b) add your name, in block capitals, which EdgeCTP takes from your login details – adjust them to suit and make sure they correspond with the Formal Undertaking; c) add the place where you’ve signed and named this certificate application. This is normally the town or city name, in block capitals; d) finally, add the date you’ve signed, named, and placed this certificate i.e. today’s date in the format dd-mmm-yyyy e.g. 31-MAR-2020.
- Box 9 Applicant Detail – Optionally, only complete this box if the firm making the certificate application (i.e. you) was NOT the same-named firm in box 1 (i.e. you’re applying on behalf of someone else). If this is the case, then add your firm’s name; your full name, and full address in this box.
- Section 10 Declaration – on a paper version of the certificate this is found on the reverse side of the application (pink) page. In EdgeCTP, you simply scroll down and tick the relevant goods origin source of 1, 2, or 3 boxes. Tick either one or as many as that apply. For example, if some of the goods were made and materials sourced wholly from the United Kingdom, whilst some of the goods were NOT wholly comprised of components or materials sourced from the United Kingdom, then you’d tick boxes 1 + 2. Additionally, as to who produced the goods, provide the firm name + address who was responsible for goods manufacture or processing by clicking the [+ Line] button; completing the fields in the pop-up box and clicking [Save].
- Section 11 Supporting Document(s) Attachments – use this section to add the required document(s) to support your certificate application (see the previous section above). In all cases, you will need a Commercial Invoice, so use the [+ Attach] button to either attach or create and attach a Commercial Invoice. The [+ Attach] can also be used to simply attach other supporting documents, i.e. Packing List, Letter of Credit, etc.
- Section 12 Number(s) Required – use this section to specify the number of original and copies of the physical paper certificate you require. By default, you get 1 original and 1 copy. You can adjust them to suit. A visual representation of what you’ll physically get is also displayed, so double-check this is correct before proceeding.
- Section 13 Payment + Instructions + Notes to Chamber – this is the final section of the certificate application. Here you specify a) Method of Payment, which is how you’ll pay the chamber for certifying your certificate application; b) Supporting Docs Submission Method, which is usually set to ‘attachment‘, referring to the documents you attached in section 12 (if you skipped any document attachments then set this to the other method by which you’ll get the supporting documents sent to the chamber); c) double-check the [Authorised Signatories] match your signature on the certificate with those from the Formal Undertaking, and d) use the [+ Note] to add any notes or instructions to the chamber.
- As a final set click the [Send For Certification] button and choose the Chamber you wish to send the Certificate application for processing; confirm the dialog boxes and the certificate is sent to the Chamber for processing.
The EC Certificate of Origin is then sent to the Chamber of Commerce for processing. You will also get an email as confirmation that the certificate has been sent. Simply wait for the Certificate status to change to “CERTIFIED”, which means the Chamber has certified your certificate.
If your certificate type was a standard certificate, then the chamber will print the certificate, stamp + sign (with wet ink), and return it to you using the postal service (or you ask to collect it too – if the chamber allows that). If the certificate type was an electronic certificate, i.e. express or premium express, then you self-print the certificate at your own premises (together with digital signatures + stamps) – see the following section on how to do that.
In the unlikely event, the certificate does NOT get certified in good time or is reject (with a reason) by the Chamber, then contact the Chamber directly to understand the reason for the delay or rejection. Alternatively, our support team would be delighted to help you too.
How to Self-Print an EC Certificate of Origin
In the case of electronic online EC Certificates of Origin, where you may have selected “Express” or “Premium Express”, you will be expected to self-print any of these types of certificates once their status becomes “CERTIFIED” on your EdgeCTP Certificates Dashboard. The following steps show you how to self-print an EC Certificate of Origin.
Get Pre-Printed, Pre-Paid, Certificate Paper
BEFORE starting, make sure you have the correct Chamber supplied, pre-printed blank paper certificates, onto which you will be printing your data + digital stamps and signatures. You can contact your chamber (preferably the one who certified your certificate) to ‘pre-purchase’ your certificate paper. Each certificate comes in 3 parts (white = original; yellow = copy and pink = 2nd copy). You’ll be printing your certified certificate’s data on all three pages. Also since you will need to print data on the reverse of the 3rd page, make sure you know if your printer supports double-sided printing or not.
Print A Test Page For Print Alignment Testing
- Open the Certificates Dashboard by choosing Docs-n-Certs > Certificates and search for the EXP or PEX certificate types that have a status of “Certified“.
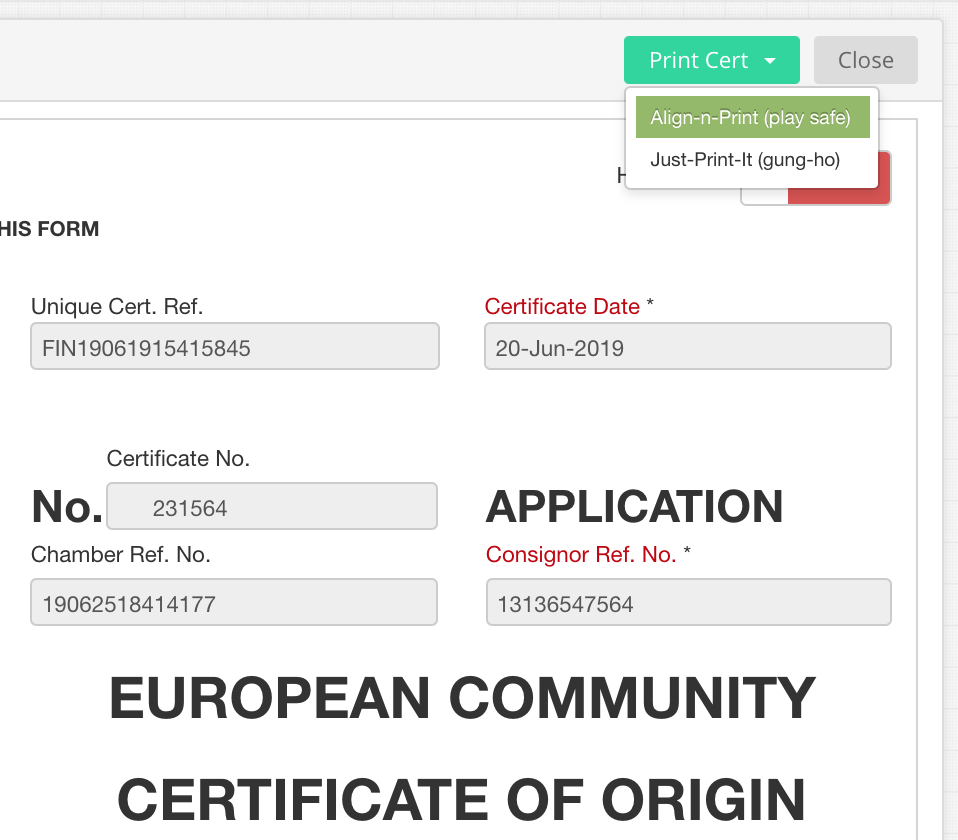
- For the “Certified” status (certificates of type ‘EXP‘ or ‘PEX‘), use the Action of ‘Edit‘ (pen icon) to open the certificate, and view the Check Print Settings dialog box.
- From the Print Cert button choose Align-n-Print (play safe). This is because we want to check FIRST if your print setting is correctly aligned, for printing the certificate information, on the pre-printed blank certificate paper, which you’d pre-purchased from the Chamber.
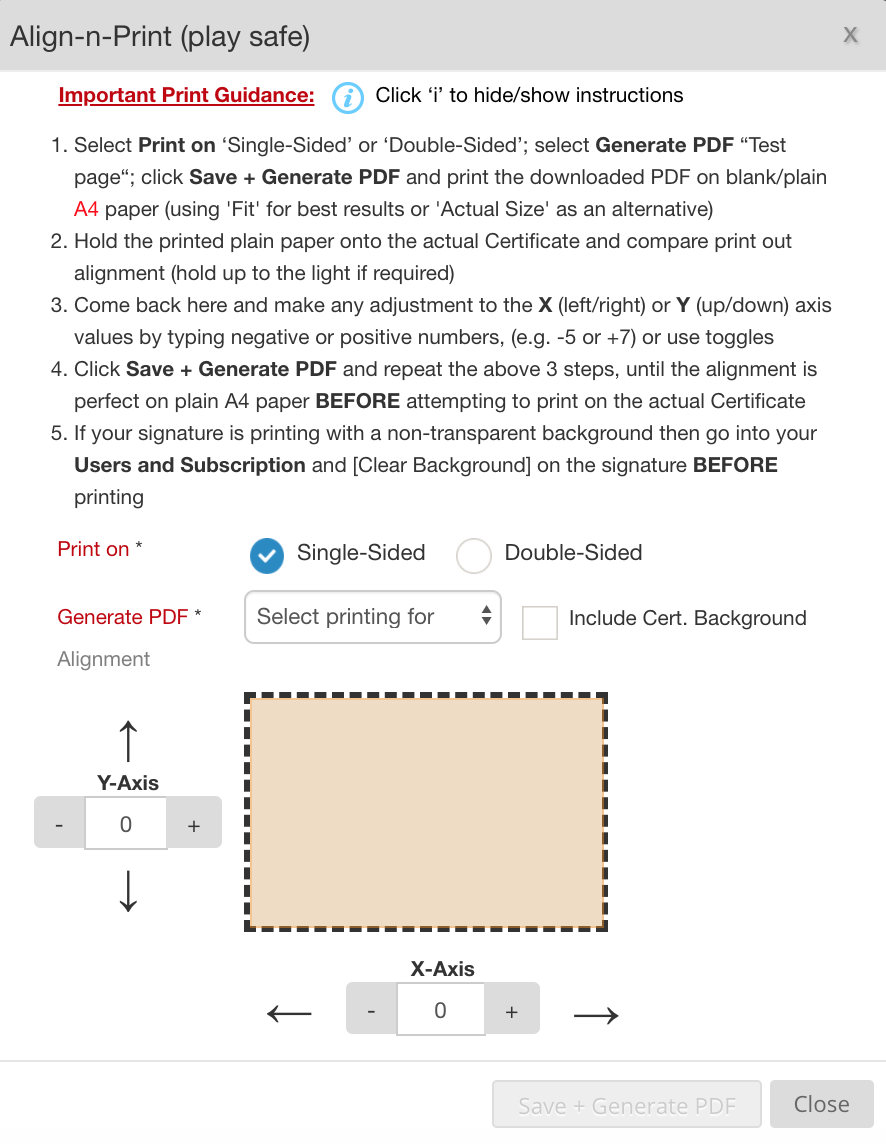
- Once the Align-n-Print pop-up appears, follow the Print Guidance instructions (click the ‘i‘ information icon if there are no instructions show):
- 1. Select Print On: ‘Single-Sided’ or ‘Double-Sided’; select Generate PDF “Test page“; click Save + Generate PDF and print the downloaded PDF on blank/plain A4 paper (using ‘Fit’ for best results or ‘Actual Size’ as an alternative).
- 2. Hold the printed plain paper onto the actual Certificate paper and compare print out alignment (hold up to the light if required).
- 3. Come back here and make any adjustment to the X (left/right) or Y (up/down) axis values by typing negative or positive numbers, (e.g. -5 or +7) or use the toggles.
- 4. Click Save + Generate PDF and repeat the above 3 steps until the alignment is perfect on plain A4 paper BEFORE attempting to print on the actual Certificate.
- 5. If your signature is printing with a non-transparent background then go into your Users and Subscription and [Clear Background] on the signature BEFORE printing.
- Once you are satisfied that the alignment is correct, then choose Generate PDF to All Pages and click [Save + Generate PDF] to show the Confirmation dialog box.
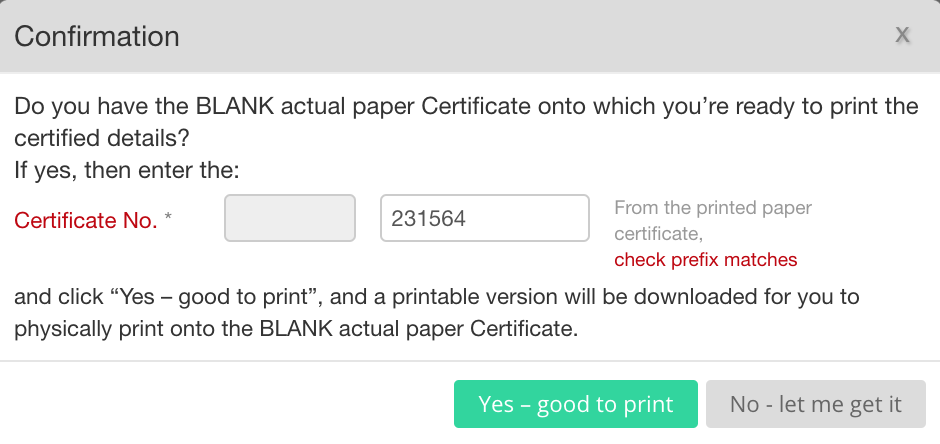
- Enter Certificate No. and click [Yes – good to print] to download the certificate data PDF, which you should print on the ACTUAL certificate paper. And check that the printing is correct. If printing is good, then [Yes – All Done] (of if not good then you’ll need to print again on a new certificate paper).
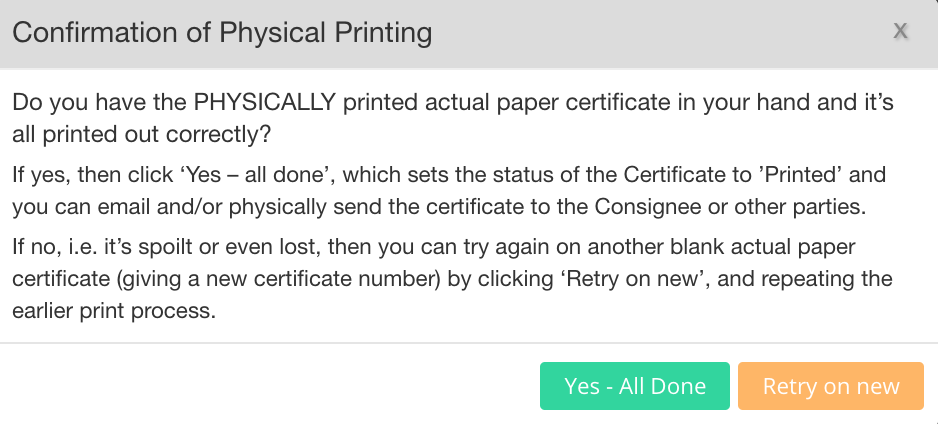
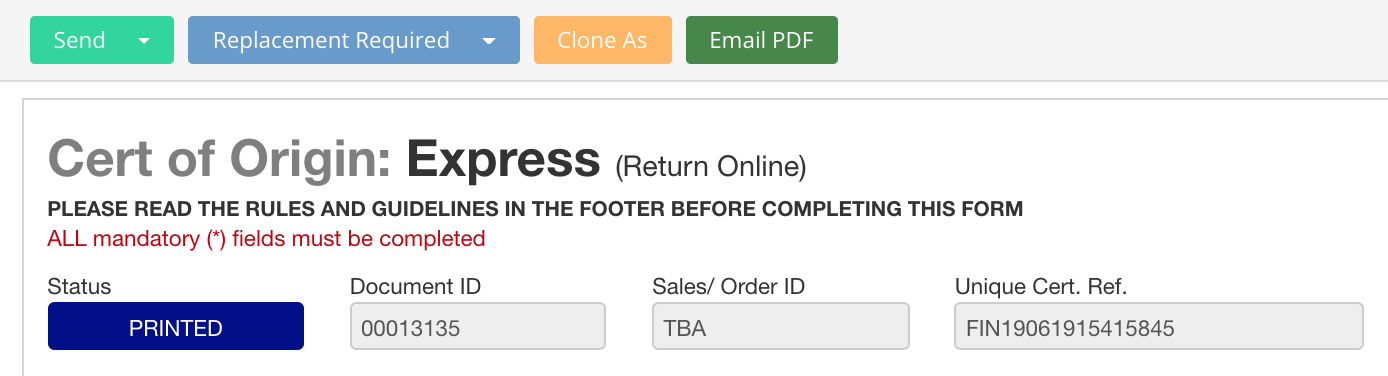
- Status of the Certificate then will be changed to ‘PRINTED‘.
The printed certificate will have electronic stamps + signatures.
Leave a Reply